# Account billing details
Source: https://docs.strapi.io/cloud/account/account-billing
# Account billing & invoices
Through the *Profile* page, accessible by clicking on your profile picture on the top right hand corner of the interface then clicking on **Profile**, you can access the [ *Billing*](#account-billing) and [ *Invoices*](#account-invoices) tabs.
## Account billing
The *Billing* tab displays and enables you to modify the billing details and payment method set for the account.
The *Payment method* section of the *Billing* tab allows you to manage the credit cards that can be used for the Strapi Cloud projects. The *Billing details* section requires to be filled in, at least for the mandatory fields, as this information will be the default billing details for all Strapi Cloud projects related to your account.
### Adding a new credit card
1. In the *Payment method* section of the *Billing* tab, click on the **Add card** button.
2. Fill in the following fields:
| Field name | Description |
| --- | --- |
| Card Number | Write the number of the credit card to add as payment method. |
| Expires | Write the expiration date of the credit card. |
| CVC | Write the 3-numbers code displayed at the back of the credit card. |
3. Click on the **Save** button.
:::tip
The first credit card to be added as payment method for the account will by default be the primary one. It is however possible to define another credit card as primary by clicking on the icon, then **Switch as primary**.
:::
### Deleting a credit card
To remove a credit card from the list of payment methods for the account:
1. Click on the icon of the credit card you wish to delete.
2. Click **Remove card**. The card is immediately deleted.
:::note
You cannot delete the primary card as at least one credit card must be available as payment method, and the primary card is by default that one. If the credit card you wish to delete is currently the primary card, you must first define another credit card as primary, then delete it.
:::
## Account invoices
The *Invoices* tab displays the complete list of invoices for all your Strapi Cloud projects.
:::strapi Invoices are also available per project.
In the *Settings > Invoices* tab of any project, you will find the invoices for that project only. Feel free to check the [dedicated documentation](/cloud/projects/settings#invoices).
:::
# Profile settings
Source: https://docs.strapi.io/cloud/account/account-settings
# Profile settings
The *Profile* page enables you to manage your account details and preferences. It is accessible by clicking on your profile picture, on the top right hand corner of the interface, and **Profile**.
There are 3 tabs available in the *Profile* interface: [*General*](#general), *Billing* and Invoices (the last 2 are documented in the [Account billing details](/cloud/account/account-billing) section of this documentation).
## General
The *General* tab enables you to edit the following details for your account profile:
- Details: to see the name associated with your account.
- Connected accounts: to manage Google, GitHub, GitLab and email accounts connected with your Strapi Cloud account (see [Managing connected accounts](#managing-connected-accounts)).
- Delete account: to permanently delete your Strapi Cloud account (see [Deleting Strapi Cloud account](#deleting-strapi-cloud-account)).
### Managing connected accounts
You can connect a Google, GitLab, GitHub and email account to your Strapi Cloud account. The _Connected accounts_ section lists accounts that are currently connected to your Strapi Cloud account. From there you can also connect a new Google, GitLab, GitHub and email account if one is not already connected.
To connect a new Google, GitLab, GitHub or email account to your Strapi Cloud account, click on the **Connect account** button and follow the next steps on the corresponding website.
You can also click on the three dots button of a connected account and click on the "Manage on" button to manage your GitHub, GitLab or Google account directly on the corresponding website.
### Deleting Strapi Cloud account
You can delete your Strapi Cloud account, but it will be permanent and irreversible. All associated projects and their data will be deleted as well and the subscriptions for the projects will automatically be canceled.
1. In the *Delete account* section of the *General* tab, click on the **Delete account** button.
2. In the dialog, type `DELETE` in the textbox.
3. Confirm the deletion of your account by clicking on the **Delete** button.
# Database
Source: https://docs.strapi.io/cloud/advanced/database
# Database
Strapi Cloud provides a pre-configured PostgreSQL database by default. However, you can also configure it to utilize an external SQL database, if needed.
:::prerequisites
- A local Strapi project running on `v4.8.2+`.
- Credentials for an external database.
- If using an existing database, the schema must match the Strapi project schema.
:::
:::caution
While it's possible to use an external database with Strapi Cloud, you should do it while keeping in mind the following considerations:
- Strapi Cloud already provides a managed database that is optimized for Strapi.
- Using an external database may result in unexpected behavior and/or performance issues (e.g., network latency may impact performance). For performance reasons, it's recommended to host your external database close to the region where your Strapi Cloud project is hosted. You can find where your Strapi Cloud project is hosted in your Project Settings (see [Project Settings > General > Selected Region](/cloud/projects/settings#general)).
- Strapi can't provide security or support with external databases used with Strapi Cloud.
:::
:::warning
Any environment variable added to your project that starts with `DATABASE_` will cause Strapi Cloud to assume that you will be using an external database and all Strapi Cloud specific database variables will not be injected!
:::
## Configuration
The project `./config/database.js` or `./config/database.ts` file must match the configuration found in the [environment variables in database configurations](https://docs.strapi.io/cms/configurations/database#environment-variables-in-database-configurations) section.
Before pushing changes, add environment variables to the Strapi Cloud project:
1. Log into Strapi Cloud and click on the corresponding project on the Projects page.
2. Click on the **Settings** tab and choose **Variables** in the left menu.
3. Add the following environment variables:
| Variable | Value | Details |
| ---------------------------------- | ---------------- |----------|
| `DATABASE_CLIENT` | your_db | Should be one of `mysql`, `postgres`, or `sqlite`. |
| `DATABASE_HOST` | your_db_host | The URL or IP address of your database host |
| `DATABASE_PORT` | your_db_port | The port to access your database |
| `DATABASE_NAME` | your_db_name | The name of your database |
| `DATABASE_USERNAME` | your_db_username | The username to access your database |
| `DATABASE_PASSWORD` | your_db_password | The password associated to this username |
| `DATABASE_SSL_REJECT_UNAUTHORIZED` | false | Whether unauthorized connections should be rejected |
| `DATABASE_SCHEMA` | public | - |
4. Click **Save**.
:::caution
To ensure a smooth deployment, it is recommended to not change the names of the environment variables.
:::
## Deployment
To deploy the project and utilize the external database, push the changes from earlier. This will trigger a rebuild and new deployment of the Strapi Cloud project.
Once the application finishes building, the project will use the external database.
## Reverting to the default database
To revert back to the default database, remove the previously added environment variables related to the external database from the Strapi Cloud project dashboard, and save. For the changes to take effect, you must redeploy the Strapi Cloud project.
# Email Provider
Source: https://docs.strapi.io/cloud/advanced/email
# Email Providers configuration for Strapi Cloud
Strapi Cloud comes with a basic email provider out of the box. However, it can also be configured to utilize another email provider, if needed.
:::caution
Please be advised that Strapi is unable to provide support for third-party email providers.
:::
:::prerequisites
- A local Strapi project running on `v4.8.2+`.
- Credentials for another email provider (see
:::caution
The file structure must match the above path exactly, or the configuration will not be applied to Strapi Cloud.
:::
Each provider will have different configuration settings available. Review the respective entry for that provider in the
:::tip
Before pushing the above changes to GitHub, add environment variables to the Strapi Cloud project to prevent triggering a rebuild and new deployment of the project before the changes are complete.
:::
### Strapi Cloud Configuration
1. Log into Strapi Cloud and click on the corresponding project on the Projects page.
2. Click on the **Settings** tab and choose **Variables** in the left menu.
3. Add the required environment variables specific to the email provider.
4. Click **Save**.
**Example:**
## Deployment
To deploy the project and utilize another party email provider, push the changes from earlier. This will trigger a rebuild and new deployment of the Strapi Cloud project.
Once the application finishes building, the project will use the new email provider.
:::strapi Custom Provider
If you want to create a custom email provider, please refer to the [Email providers](/cms/features/email#providers) documentation in the CMS Documentation.
:::
# Upload Provider Configuration for Strapi Cloud
Source: https://docs.strapi.io/cloud/advanced/upload
# Upload Provider Configuration for Strapi Cloud
Strapi Cloud comes with a local upload provider out of the box. However, it can also be configured to utilize a third-party upload provider, if needed.
:::caution
Please be advised that Strapi is unable to provide support for third-party upload providers.
:::
:::prerequisites
- A local Strapi project running on `v4.8.2+`.
- Credentials for a third-party upload provider (see
:::caution
The file structure must match the above path exactly, or the configuration will not be applied to Strapi Cloud.
:::
Each provider will have different configuration settings available. Review the respective entry for that provider in the
### Configure the Security Middleware
Due to the default settings in the Strapi Security Middleware you will need to modify the `contentSecurityPolicy` settings to properly see thumbnail previews in the Media Library.
To do this in your Strapi project:
1. Navigate to `./config/middlewares.js` or `./config/middlewares.ts` in your Strapi project.
2. Replace the default `strapi::security` string with the object provided by the upload provider.
**Example:**
:::tip
Before pushing the above changes to GitHub, add environment variables to the Strapi Cloud project to prevent triggering a rebuild and new deployment of the project before the changes are complete.
:::
### Strapi Cloud Configuration
1. Log into Strapi Cloud and click on the corresponding project on the Projects page.
2. Click on the **Settings** tab and choose **Variables** in the left menu.
3. Add the required environment variables specific to the upload provider.
4. Click **Save**.
**Example:**
## Deployment
To deploy the project and utilize the third-party upload provider, push the changes from earlier. This will trigger a rebuild and new deployment of the Strapi Cloud project.
Once the application finishes building, the project will use the new upload provider.
:::strapi Custom Provider
If you want to create a custom upload provider, please refer to the [Providers](/cms/features/media-library#providers) documentation in the CMS Documentation.
:::
# Command Line Interface (CLI)
Source: https://docs.strapi.io/cloud/cli/cloud-cli
# Command Line Interface (CLI)
Strapi Cloud comes with a Command Line Interface (CLI) which allows you to log in and out, and to deploy a local project without it having to be hosted on a remote git repository. The CLI works with both the `yarn` and `npm` package managers.
:::note
It is recommended to install Strapi locally only, which requires prefixing all of the following `strapi` commands with the package manager used for the project setup (e.g `npm run strapi help` or `yarn strapi help`) or a dedicated node package executor (e.g. `npx strapi help`).
:::
## strapi login
**Alias:** `strapi cloud:login`
Log in Strapi Cloud.
```bash
strapi login
```
This command automatically opens a browser window to first ask you to confirm that the codes displayed in both the browser window and the terminal are the same. Then you will be able to log into Strapi Cloud via Google, GitHub or GitLab. Once the browser window confirms successful login, it can be safely closed.
If the browser window doesn't automatically open, the terminal will display a clickable link as well as the code to enter manually.
## strapi deploy
**Alias:** `strapi cloud:deploy`
Deploy a new local project (< 100MB) in Strapi Cloud.
```bash
strapi deploy
```
This command must be used after the `login` one. It deploys a local Strapi project on Strapi Cloud, without having to host it on a remote git repository beforehand. The terminal will inform you when the project is successfully deployed on Strapi Cloud.
Deploying a Strapi project through the CLI creates a project on the Free plan.
Once the project is first deployed on Strapi Cloud with the CLI, the `deploy` command can be reused to trigger a new deployment of the same project.
:::note
Once you deployed your project, if you visit the Strapi Cloud dashboard, you may see some limitations as well as impacts due to creating a Strapi Cloud project that is not in a remote repository and which was deployed with the CLI.
- Some areas in the dashboard that are usually reserved to display information about the git provider will be blank.
- Some buttons, such as the **Trigger deploy** button, will be greyed out and unclickable since, unless you have [connected a git repository to your Strapi Cloud project](/cloud/getting-started/deployment-cli#automatically-deploying-subsequent-changes).
:::
## strapi link
**Alias:** `strapi cloud:link`
Links project in the current folder to an existing project in Strapi Cloud.
```bash
strapi link
```
This command connects your local project in the current directory with an existing project on your Strapi Cloud account. You will be prompted to select the project you wish to link from a list of available projects hosted on Strapi Cloud.
## strapi projects
**Alias:** `strapi cloud:projects`
Lists all Strapi Cloud projects associated with your account.
```bash
strapi projects
```
This command retrieves and displays a list of all projects hosted on your Strapi Cloud account.
## strapi logout
**Alias:** `strapi cloud:logout`
Log out of Strapi Cloud.
```bash
strapi logout
```
This command logs you out of Strapi Cloud. Once the `logout` command is run, a browser page will open and the terminal will display a confirmation message that you were successfully logged out. You will not be able to use the `deploy` command anymore.
# Caching & Performance
Source: https://docs.strapi.io/cloud/getting-started/caching
# Caching & Performance
For Strapi Cloud applications with large amounts of cacheable content, such as images, videos, and other static assets, enabling CDN (Content Delivery Network) caching via the
# Strapi Cloud の基礎
Source: https://docs.strapi.io/cloud/getting-started/cloud-fundamentals
# Strapi Cloud の基礎
Strapi Cloud のドキュメントを読み進む前に、ここで紹介する主要な概念を押さえておくことをおすすめします。Strapi Cloud の仕組みの理解とスムーズな利用に役立ちます。
- **ホスティングプラットフォーム** Strapi Cloud は、Strapi CMS(コンテンツ管理システム)で作成した既存の Strapi プロジェクトをデプロイするためのホスティングプラットフォームです。Strapi CMS の SaaS()版ではなく、むしろ PaaS()と捉えてください。Strapi CMS については [CMS ドキュメント](/cms/intro) を参照してください。
- **Strapi Cloud の料金プラン** Strapi Cloud では Free、Essential、Pro、Scale の 4 プランから選べます。プランにより利用できる機能、サポート、カスタマイズの範囲が異なります(詳細は [料金ページ](https://strapi.io/pricing-cloud))。本ドキュメントでは、セクション見出しの下に 、、 バッジが付く場合、その機能は該当する有料プラン以降でのみ利用できます。バッジがない場合は Free プランでも利用できます。
- **Strapi Cloud のユーザーの種類** Strapi Cloud プロジェクトには、オーナーとメンテナーの 2 種類のユーザーがいます。オーナーはプロジェクトを作成したユーザーで、プロジェクトに関するすべての機能・オプションにアクセスできます。メンテナーはオーナーに招待され、既存プロジェクトに参加するユーザーです。メンテナーがダッシュボードで参照・操作できない範囲については [コラボレーション](/cloud/projects/collaboration) を参照してください。
- **サポート** Strapi サポートチームの対応範囲は、契約している Strapi Cloud のプランによります。Free プランにはサポートは含まれません。Essential と Pro は Basic サポート、Scale は Standard サポートです。レベルの詳細は [サポートに関する記事](https://support.strapi.io/support/solutions/articles/67000680833-what-is-supported-by-the-strapi-team#Not-Supported) を参照してください。
- **Strapi Cloud とセルフホストでの API** REST API と GraphQL API の挙動は Strapi Cloud とセルフホストで同じです。違いは主に URL です。
- API のベースドメイン: Strapi Cloud では環境のドメイン(例: `https://.strapiapp.com/api/...`)を使うか、独自ドメインを設定した場合はそのドメインを使います([ドメイン](/cloud/projects/settings#domains))。セルフホストでは公開するドメインを任意に設定します。
- メディアライブラリの URL: Strapi Cloud の REST / GraphQL レスポンスでは、カスタムドメインで API にアクセスしていても、メディアフィールドの URL はプロジェクトのメディアドメイン(例: `.media.strapiapp.com`)になります。セルフホストでは設定したアップロードプロバイダーの URL が返り、自サイトや CDN と一致させられます。セルフホストから Strapi Cloud に移行する場合は、フロントエンドが API が返す絶対 URL を読むか、Strapi Cloud のメディアドメインを受け入れるようにしてください。
# Strapi Cloud - ダッシュボードからのデプロイ
Source: https://docs.strapi.io/cloud/getting-started/deployment
# Cloud ダッシュボードからプロジェクトをデプロイする
初めて Strapi Cloud にプロジェクトを載せるときの、Cloud ダッシュボード利用の手順です。
:::prerequisites
Cloud ダッシュボードからデプロイする前に次を満たしてください。
* Strapi バージョン `4.8.2` 以上
* プロジェクトのデータベースは PostgreSQL と互換であること。外部 DB はサポート・推奨されませんが設定は可能です([高度なデータベース設定](/cloud/advanced/database))。
* ソースコードが
5. Strapi Cloud プロジェクトを設定します。
5.a. 次の情報を入力します。
| 設定名 | 説明 |
|--------------|---------------------------------------------------------------------------------------------------------|
| Display name | 選んだリポジトリ名が自動入力されますが、必要なら編集できます。 |
| Git branch | デプロイするブランチをドロップダウンから選びます。 |
| Deploy on push | 選択したブランチへの push で自動デプロイする場合はオン。オフの場合は手動で最新をデプロイします。 |
| Region | Strapi をホストするサーバーの地理的リージョン。米国(東)、欧州(西)、東南アジアから選べます。 |
:::note
Git ブランチと「Deploy on push」は後からプロジェクト設定で変更できます。ホスティングリージョンは**プロジェクト作成時のみ**選べます([プロジェクト設定](/cloud/projects/settings))。
:::
5.b. (任意)**Show advanced settings** で次を入力します。
| 設定名 | 説明 |
|--------------|---------------------------------------------------------------------------------------------------------|
| Base directory | リポジトリ内で Strapi アプリがあるディレクトリ名。モノレポや同一リポジトリに複数アプリがあるときに使用します。 |
| Environment variables | **Add variable** で Strapi の環境変数を追加します([環境変数](/cms/configurations/environment/))。Strapi アプリ直下の `.env` にも定義でき、Strapi Cloud でも利用されます。 |
| Node version | ドロップダウンで Node バージョンを選びます。既定はプロジェクトの Strapi に合うよう自動選択されます。手動で合わないバージョンを選ぶとビルドは失敗し、ビルドログに理由が出ます。 |
:::strapi 環境変数の利用
環境変数で Strapi Cloud 既定以外の外部データベースに接続できます(詳細は [データベース設定](/cms/configurations/database#environment-variables-in-database-configurations))。Strapi 既定の DB に戻す場合は `DATABASE_` で始まる環境変数を削除します(自動マイグレーションはありません)。
カスタムのメールプロバイダーもここで設定できます。Strapi Cloud 上のアプリでは Sendgrid が既定です([プロバイダー設定](/cms/features/email#providers))。
:::
## 請求情報の設定
:::strapi Free プランに請求ステップはありません
Free を選んだ場合、クレジットカード入力は求められず、このステップはスキップされます。
下のセクションのステップ 5 に進み、プロジェクト作成を完了してください。
:::
1. **Continue to billing** をクリックします。請求ページで支払い情報を入力し、請求内容を確認します。
2. *Payment method* でクレジットカードを追加します。このカードがアドオンや超過分などプロジェクト関連の課金に使われます。
3. *Billing information* に支払い・請求先住所を入力します。
4. *Invoice* を確認します。月額契約の場合、現在の請求サイクル残り日数に応じて日割りが入ります。*Discount code* を展開してコードを入力することもできます。
:::note
請求先に応じて税が加算されることがあります。
- EU / 英国: 有効な VAT ID があれば VAT は免除。なければ請求書に VAT が加算されます。
- 米国: 州と住所に基づき売上税が計算されます。
:::
5. **Subscribe** をクリックして Strapi Cloud プロジェクトの作成を完了します。
## プロジェクトのデプロイ
作成を確定すると *Project dashboard* に移り、作成と初回デプロイの進行を追跡できます。
デプロイ中でも [プロジェクト設定](/cloud/projects/settings) の一部を先に構成できます。
:::note
作成中にエラーが出ると、進行表示が止まりエラーメッセージが表示されます。失敗したステップの横に **Retry** が出るので、作成プロセスを再開できます。
:::
デプロイが成功すると、作成トラッカーがデプロイ一覧に置き換わり、クラウド上のアプリにアクセスできます。Strapi プロジェクトを共有する前に、最初の管理者ユーザーを作成してください。
## 次のステップ
Cloud ダッシュボードからデプロイできたら、次も試してください。
- 他のユーザーを [プロジェクトに招待](/cloud/projects/collaboration) する
- [デプロイ管理](/cloud/projects/deploys) で新しいデプロイの手順を読む
# Strapi Cloud - CLI deployment
Source: https://docs.strapi.io/cloud/getting-started/deployment-cli
# Project deployment with the Command Line Interface (CLI)
This is a step-by-step guide for deploying your project on Strapi Cloud for the first time, using the Command Line Interface.
:::prerequisites
Before you can deploy your Strapi application on Strapi Cloud using the Command Line Interface, you need to have the following prerequisites:
- Have a Google, GitHub or GitLab account.
- Have an already created Strapi project (see [Installing from CLI in the CMS Documentation](/cms/installation/cli)), stored locally. The project must be less than 100MB.
- Have available storage in your hard drive where the temporary folder of your operating system is stored.
:::
## Logging in to Strapi Cloud
1. Open your terminal.
2. Navigate to the folder of your Strapi project, stored locally on your computer.
3. Enter the following command to log into Strapi Cloud:
4. In the browser window that opens automatically, confirm that the code displayed is the same as the one written in the terminal message.
5. Still in the browser window, choose whether to login via Google, GitHub or GitLab. The window should confirm the successful login soon after.
## Deploying your project
1. From your terminal, still from the folder of your Strapi project, enter the following command to deploy the project:
2. Follow the progression bar in the terminal until confirmation that the project was successfully deployed with Strapi Cloud.
Deploying the project will create a new Strapi Cloud project on the Free plan.
### Automatically deploying subsequent changes
By default, when creating and deploying a project with the Cloud CLI, you need to manually deploy again all subsequent changes by running the corresponding `deploy` command everytime you make a change.
Another option is to enable automatic deployment through a git repository. To do so:
1. Host your code on a git repository, such as or .
2. Connect your Strapi Cloud project to the repository (see the _Connected repository_ setting in [Projects Settings > General](/cloud/projects/settings#general)).
3. Still in _Projects Settings > General_ tab, tick the box for the "Deploy the project on every commit pushed to this branch" setting. From now on, a new deployment to Strapi Cloud will be triggered any time a commit is pushed to the connected git repository.
:::note
Automatic deployment is compatible with all other deployment methods, so once a git repository is connected, you can trigger a new deployment to Strapi Cloud [from the Cloud dashboard](/cloud/projects/deploys), [from the CLI](/cloud/cli/cloud-cli#strapi-deploy), or by pushing new commits to your connected repository.
:::
## ⏩ What to do next?
Now that you have deployed your project via the Command Line Interface, we encourage you to explore the following ideas to have an even more complete Strapi Cloud experience:
- Visit the Cloud dashboard to follow [insightful metrics and information](/cloud/projects/overview) on your Strapi project.
- Check out the full [Command Line Interface documentation](/cloud/cli/cloud-cli) to learn about the other commands available.
# Project deployment
Source: https://docs.strapi.io/cloud/getting-started/deployment-options
# Project deployment with Strapi Cloud
You have 2 options to deploy your project with Strapi Cloud:
- either with the user interface (UI), meaning that you will perform all the actions directly on the Strapi Cloud dashboard,
- or using the Cloud Comment Line Interface (CLI), meaning that you will only interact with a terminal.
The guides below will guide you through all the steps for each of the deployment options.
# Strapi Cloud ドキュメントへようこそ
Source: https://docs.strapi.io/cloud/getting-started/intro
# Strapi Cloud ドキュメントへようこそ
Strapi Cloud ドキュメントには、Strapi Cloud アカウントとアプリケーションのセットアップ、デプロイ、更新、カスタマイズに関する情報がまとまっています。
:::strapi Strapi Cloud とは?
です。
:::
:::prerequisites
Strapi チームが推奨する典型的な流れは次のとおりです。
1. ローカルで Strapi アプリケーションを作成する(v4.8.2 以降)。
2. 必要に応じてプラグインや独自コードで拡張する。
3. Git プロバイダー(GitHub または GitLab)でコードベースをバージョン管理する。
4. Strapi Cloud にアプリケーションをデプロイする。
:::
Strapi Cloud ドキュメントは、プロダクト利用の流れに沿ったトピック順に構成されています。次のカードをクリックすると、主要なトピックと手順へ移動します。
:::strapi Strapi コミュニティへようこそ!
Strapi Cloud は、オープンソースでコミュニティ志向の Strapi の上に構築されています。Strapi チームはビジョンを共有し、コミュニティとともに Strapi の未来を形作りたいと考えています。そのため は公開されており、さまざまな知見がプロジェクトの方向づけに役立ちます。コミュニティの誰もがアイデアや意見を共有できます。
、、 に参加すれば、長年の経験と知識、コントリビューションをコミュニティ全体から得られます。
:::
# 請求と利用に関する情報
Source: https://docs.strapi.io/cloud/getting-started/usage-billing
# 請求と利用に関する情報
Strapi Cloud アカウントとプロジェクトの利用・請求に関する概要です。
Strapi Cloud には Free と、有料の Essential / Pro / Scale があります([料金ページ](https://strapi.io/pricing-cloud))。下表は主な機能と利用枠の整理です。
| 機能 | Free | Essential | Pro | Scale |
| -------------------------------- | ----- | --------- | --- | ----- |
| **データベースエントリ数** | 500 | 無制限* | 無制限* | 無制限* |
| **アセットストレージ** | 10GB | 50GB | 250GB | 1,000GB |
| **アセット帯域幅(月あたり)** | 10GB | 50GB | 500GB | 1,000GB |
| **API リクエスト(月あたり)** | 2,500 | 50,000 | 1,000,000 | 10,000,000 |
| | | | | |
| **バックアップ** | 該当なし | 該当なし | 週次 | 日次 |
| **カスタムドメイン** | 該当なし | 含まれる | 含まれる | 含まれる |
| **環境** | 該当なし | 該当なし | 0 含む(最大 99 まで追加) | 1 含む(最大 99 まで追加) |
| **メール(月あたり)** | 100 | 無制限* | 無制限* | 無制限* |
:::strapi 利用量と機能の補足
- 一般的な機能・利用量:
- データベースエントリ数は DB 内のエントリー件数です。
- アセットストレージはアセットが占める容量です。
- アセット帯域幅はアセット配信に使った転送量です。
- API リクエストは API へのリクエスト数です。GraphQL と REST を含み、CDN の帯域・ストレージとしてカウントされるメディアファイル向けリクエストは除きます。レスポンスの種類に関わらず、月間利用量に含まれます。
- Cloud 固有の機能:
- バックアップは Strapi Cloud プロジェクトの自動バックアップです(詳細は [バックアップ](/cloud/projects/settings#backups))。
- カスタムドメインは Strapi Cloud 用の独自ドメイン設定です([カスタムドメイン](/cloud/projects/settings#connecting-a-custom-domain))。
- 環境数は、既定の本番環境に加えてプランに含まれる追加環境の数です([環境](/cloud/projects/settings#environments))。
:::
:::caution Free プランは個人・非商用のみ
商用利用には次のようなものが含まれます。
- サイトでの決済の受け付け・処理
- サイトの作成・更新・ホストの対価としての報酬
- 商品・サービスの広告・宣伝・販売
- 第三者向け広告のホスト・配信
詳細は [Strapi Cloud-Legal](https://strapi.io/cloud-legal) を参照してください。
:::
:::info Free プランのスケールゼロとコールドスタート
Free プランでは、しばらくアクセスがないとプロジェクトが自動的にスケールダウンしてゼロになります。フロントエンドや API から再度アクセスすると、応答が返るまで数秒〜1 分ほどかかることがあります。
有料プランに上げるとスケールゼロとコールドスタートが無効になり、常にすぐ応答しやすくなります。
:::
## 環境の管理
環境は Strapi Cloud プロジェクトの隔離されたインスタンスです。すべてのプロジェクトに既定の本番環境があり、Pro または Scale ではプロジェクト設定の *Environments* タブから追加環境を構成できます([環境](/cloud/projects/settings#environments))。追加環境の数に上限はありません。
追加環境の利用上限は本番環境と同じです(例: Pro ならアセットストレージも 250GB まで。超過料金の扱いも本番と同様)。ただしアセット帯域と API 呼び出しは**プロジェクト単位**のため、環境を増やしてもこれらの枠自体は増えません。
## 請求
請求は Strapi Cloud プロジェクトの利用に基づきます。プロジェクトのプランとアドオンは請求サイクルに応じて月払いまたは年払い、超過分は月次請求です。利用量と請求はプロジェクト設定の *Billing & Usage* で確認できます。
### 税
米国・英国・EU の請求先住所では、地域の税が請求書に加算されることがあります。税額は請求先と VAT/Tax ID の状態に基づき、チェックアウトと請求書に表示されます。
VAT/Tax ID は [アカウントの請求](/cloud/account/account-billing) 設定で追加・更新できます。
### 超過利用(Overages)
:::caution
Free プランでは超過利用はできません。
:::
API リクエスト、アセット帯域、アセットストレージの上限を超えると、超過分に対する料金が発生します。
例: Pro のアセット帯域 500GB を超えた場合、現在の請求期間の終わりかプロジェクト削除時に超過分が課金されます。超過分の日割りはなく、全額が請求されます。
超過分の料金は月次で、次のレートが適用されます。
| 機能 | レート |
| --- | --- |
| **API リクエスト** | $1.50 / 2.5 万リクエスト |
| **アセット帯域** | $30.00 / 100GB |
| **アセットストレージ** | $0.60 / GB・月 |
### プロジェクトの停止(Suspension) {#project-suspension}
**Suspended** になる理由には、未払い請求、Free プラン上限の超過、Strapi Cloud の 違反などがあります。
停止中は管理パネルにアクセスできず、新しいデプロイも実行できません。ダッシュボードに理由を示すバナーが出ます。メールでも通知されます。
#### Free プランの上限超過による停止
Free で API リクエストまたはアセット帯域のいずれかを超過すると、翌月の枠がリセットされるまで停止します。
停止中は次のとおりです。
- 新しいデプロイは実行できない
- アプリケーションへのアクセスはブロックされる
- プロジェクト設定の変更はできない
すぐ再有効化するには有料プランへのアップグレードが必要です。
#### 請求トラブルによる停止
未払い請求があるとサブスクリプションが自動解約され、プロジェクトが停止します。
再有効化するには *Settings > Billing & Usage* で **Reactivate subscription** をクリックします。
:::warning
30 日以内に解決しないと、停止中のプロジェクトは削除され、データは完全に失われます。
:::
#### その他の理由による停止
未払い以外でサブスクリプション解約に至った場合など、自分で再有効化できないことがあります。メールの手順に従ってください。通知がない場合は [Strapi Support](mailto:support@strapi.io) に連絡してください。
### サブスクリプションの解約
Strapi Cloud のサブスクリプションをやめるには次のいずれかです。
- プロジェクトのサブスクリプションを Free プランに変更する([プランのダウングレード](/cloud/projects/settings#downgrading-to-another-plan))
- プロジェクトを完全に削除する([Strapi Cloud プロジェクトの削除](/cloud/projects/settings#deleting-a-strapi-cloud-project))
# コラボレーション
Source: https://docs.strapi.io/cloud/projects/collaboration
# プロジェクトでのコラボレーション
プロジェクトは Strapi Cloud アカウントを持つユーザーが作成します。Strapi Cloud ユーザーはプロジェクトを他ユーザーに共有でき、オーナーが認証情報を共有しなくても、招待されたユーザーはプロジェクトダッシュボードにアクセスして共同作業できます。
プロジェクトに招待された共同編集者(メンテナー)は、オーナーと同じ権限は持ちません。メンテナーは次を実行できません。
- プロジェクトを第三者に共有する
- プロジェクト設定からプロジェクトを削除する
- プロジェクト設定の *Billing* セクションにアクセスする
## プロジェクトを共有する
プロジェクトは Strapi Cloud アカウントを持つユーザーが作成します。Strapi Cloud ユーザーはプロジェクトを他ユーザーに共有でき、オーナーが認証情報を共有しなくても、招待されたユーザーはプロジェクトダッシュボードにアクセスして共同作業できます。
プロジェクトに招待された共同編集者(メンテナー)は、オーナーと同じ権限は持ちません。メンテナーは次を実行できません。
- プロジェクトを第三者に共有する
- プロジェクト設定からプロジェクトを削除する
- プロジェクト設定の *Billing* セクションにアクセスする
## プロジェクトを共有する
新しいメンテナーを招待する手順:
1. *Projects* ページで対象プロジェクトをクリックし、ダッシュボードへ移動します。
2. ダッシュボードヘッダーの **Share** ボタンをクリックします。
3. *Share [project name]* ダイアログで、招待したい相手のメールアドレスを入力します。`Invite [email address]` と表示されたドロップダウンが出ます。
4. そのドロップダウンをクリックすると、入力欄の下に紫色のボックスでメールアドレスが表示されます。
5. (任意)さらに招待する場合は手順 3 と 4 を繰り返します。メールアドレスは 1 件ずつ入力しますが、招待は複数宛先をまとめて送信できます。
6. **Send** ボタンをクリックします。
招待されたメンテナーには、プロジェクト参加用リンク付きメールが送信されます。共有後は **Share** ボタンの横にメンテナーのアバターが表示され、参加人数と参加者を確認できます。
:::tip
アバターには GitHub / Google / GitLab のプロフィール画像が使われます。保留中ユーザーはアカウント有効化までイニシャル表示になります。アバターにカーソルを合わせるとフルネームを確認できます。
::::
## メンテナーを管理する
プロジェクトダッシュボードの **Share** ボタンから開く *Share [project name]* ダイアログでは、オーナーが招待済みメンテナーの一覧と各ステータスを確認し、管理できます。
フルネームが表示されているメンテナーは、招待メール経由でアカウントを有効化済みのユーザーです。一覧でメールアドレスのみが表示されている場合は、まだ有効化が完了しておらず、ダッシュボードへアクセスできません。その場合はメールアドレス横に次のステータスが表示されます。
- Pending: 招待メール送信済みで、まだアクションがない状態
- Expired: 送信から 72 時間以上経過し、招待の有効期限が切れた状態
`Expired` の場合は、**Manage** → **Resend invite** で再送できます。
### メンテナーアクセスを取り消す
メンテナーのダッシュボードアクセスを取り消す手順:
1. プロジェクトダッシュボードヘッダーの **Share** ボタンをクリックします。
2. *People with access* 一覧で対象メンテナーを探し、**Manage** をクリックします。
3. **Revoke** ボタンをクリックします。
4. 確認ダイアログで再度 **Revoke** をクリックします。
取り消されたメンテナーは、プロジェクトダッシュボードにアクセスできなくなります。
:::note
アクセス取り消し時、対象メンテナーにはメールや通知は送信されません。
::::
# デプロイ管理
Source: https://docs.strapi.io/cloud/projects/deploys
# デプロイ管理
新しい Strapi Cloud プロジェクトを作成すると、最初のデプロイが自動で実行されます。以降のデプロイは次の方法で行えます。
- 必要なときに手動で実行([Cloud ダッシュボード](#新しいデプロイを実行する) または [CLI](/cloud/cli/cloud-cli#strapi-deploy) から)
- Strapi Cloud プロジェクトが Git リポジトリに接続され、`deploy on push` が有効な場合は、対象ブランチへのコミットプッシュ時に自動実行([プロジェクト設定](/cloud/projects/settings#modifying-git-repository--branch) を参照)
進行中のデプロイは必要に応じて [手動でキャンセル](#デプロイをキャンセルする) できます。
## 新しいデプロイを実行する
プロジェクトで新しいデプロイを手動実行するには、プロジェクトダッシュボードのヘッダー右上に常時表示される **Trigger deployment** ボタンをクリックします。
実行すると *Deployments* タブに新しいカードが追加され、ステータスの監視やログのリアルタイム確認ができます([デプロイ履歴とログ](/cloud/projects/deploys-history) を参照)。
## デプロイをキャンセルする
何らかの理由で、進行中で未完了のデプロイをキャンセルする場合:
1. 最新のデプロイの *Deployment details* ページへ移動します([ログ詳細へのアクセス](/cloud/projects/deploys-history#accessing-deployment-details--logs) を参照)。
2. 右上の **Cancel deployment** ボタンをクリックします。デプロイのステータスは自動で *Canceled* に変わります。
:::tip
デプロイ履歴が表示される *Deployments* タブからもキャンセルできます。
*Building* ステータスの進行中デプロイカードには、キャンセル用の  ボタンが表示されます。
:::
# デプロイ履歴とログ
Source: https://docs.strapi.io/cloud/projects/deploys-history
# デプロイ履歴とログ {#deploy-history-and-logs}
Strapi Cloud の各プロジェクトでは、実行済みデプロイの履歴と、ビルドログ/デプロイログを含む詳細情報を確認できます。これらは *Deployments* タブで利用できます。
## デプロイ履歴を確認する {#viewing-deploy-history}
*Deployments* タブには、プロジェクトの過去デプロイ詳細が時系列カードで表示されます。
、Git プロバイダーへの直接リンク、コミットメッセージ
- デプロイステータス:
- *Deploying*
- *Done*
- *Canceled*
- *Build failed*
- *Deployment failed*
- 最終デプロイ時刻(トリガー時刻と所要時間)
- ブランチ
## デプロイ詳細とログにアクセスする {#accessing-deployment-details--logs}
*Deployments* タブでデプロイカードにカーソルを合わせると、 **Show details** ボタンが表示されます。これをクリックすると、デプロイ詳細ログを含む *Deployment details* ページへ移動します。
、Git プロバイダーへの直接リンク、このデプロイで使われたコミットメッセージ
- *Status*: *Building*、*Deploying*、*Done*、*Canceled*、*Build failed*、*Deployment failed*
- *Source*: このデプロイに対応するブランチとコミットメッセージ
- *Duration*: デプロイ所要時間と実行時刻
# 通知
Source: https://docs.strapi.io/cloud/projects/notifications
# 通知
Cloud ダッシュボード上部ナビゲーションのベルアイコン をクリックすると、Notification center を開けます。
既存の全プロジェクトに関する最新通知が一覧表示されます。通知カードをクリックすると、対応するデプロイの *Log details* ページへ移動します(詳細は [Deploy history & logs](/cloud/projects/deploys-history#accessing-deployment-details--logs) を参照)。
Notification center には次の通知が表示されます。
- *deployment completed*: デプロイが正常に完了したとき
- *Build failed*: ビルド段階でデプロイが失敗したとき
- *deployment failed*: デプロイ段階で失敗したとき
- *deployment triggered*: 接続済みリポジトリへの新規プッシュでデプロイが開始されたとき(手動トリガー時は通知されません)
:::note
30 日を超えた通知は Notification center から自動削除されます。
:::
# プロジェクトの概要
Source: https://docs.strapi.io/cloud/projects/overview
# プロジェクトの概要
*Projects* ページには、Strapi Cloud のすべてのプロジェクトが一覧表示されます。ここからプロジェクトを管理し、対応するアプリケーションへアクセスできます。
各プロジェクトカードには次の情報が表示されます。
* プロジェクト名
* 本番環境の最後に成功したデプロイの日付
* プロジェクトの現在の状態:
* *Disconnected*(リポジトリが Strapi Cloud に未接続)
* *Suspended*(停止中。[プロジェクトの停止](/cloud/getting-started/usage-billing#project-suspension) を参照して再有効化)
* *Incompatible version*(Strapi Cloud と互換性のない Strapi バージョンを使用中)
各カードには メニューがあり、次の操作ができます。
* **Visit App**: アプリケーションを開く
* **Go to Deployments**: [*Deployment*](/cloud/projects/deploys) ページへ
* **Go to Settings**: [*Settings*](/cloud/projects/settings) ページへ
:::tip
ナビゲーションバーの * Product updates* で、最新機能と修正を確認できます。
:::
## プロジェクトのダッシュボードへアクセスする
*Projects* ページで任意のプロジェクトカードをクリックするとダッシュボードが開きます。プロジェクトと環境の詳細、デプロイ履歴、各種設定へのアクセスができます。
ヘッダーから次の操作ができます。
- **Share** でプロジェクトへの共同編集ユーザーを招待する([コラボレーション](/cloud/projects/collaboration))。すでに招待済みのユーザーはアイコンで表示されます 。
- **Settings** でプロジェクトと既存環境の設定を開く 。
- 表示する環境の選択、または新しい環境の追加 。
- 新しいデプロイの実行([デプロイの管理](/cloud/projects/deploys))とアプリへの訪問 。
ダッシュボードにはほかにも次があります。
- *Deployments* と *Runtime logs* タブ(デプロイ履歴は [デプロイ履歴とログ](/cloud/projects/deploys-history)、ランタイムログは [該当ページ](/cloud/projects/runtime-logs))
- 右側のボックスにプロジェクトと環境の詳細 。内容の例:
- API 呼び出し数
- アセットの帯域幅とストレージの現在の使用量
- ブランチ名と、ブランチ設定への **Manage**([Git リポジトリとブランチの変更](/cloud/projects/settings#modifying-git-repository--branch))
- ベースディレクトリ名
- Strapi のバージョン
- Strapi アプリの URL
# ランタイムログ
Source: https://docs.strapi.io/cloud/projects/runtime-logs
# ランタイムログ
対象プロジェクトのダッシュボードでは、*Runtime logs* タブにプロジェクトのライブログが表示されます。
:::note
- *Runtime logs* は、プロジェクトのデプロイ成功後にのみ利用できます。
- Free プランではランタイムログはライブ表示されず、非アクティブによりアプリがスケールゼロになるたびにリセットされます。
:::
# プロジェクト設定
Source: https://docs.strapi.io/cloud/projects/settings
# プロジェクト設定
対象プロジェクトのダッシュボードでは、ヘッダーにある **Settings** ボタンから、Strapi Cloud プロジェクト本体と各環境の設定を管理できます。
画面左の設定メニューは、プロジェクト全体の設定と、各環境に固有の設定の 2 つに分かれています。
## プロジェクト全体の設定
プロジェクト設定には、次の 5 つのタブがあります。
- [*General*](#general),
- [*Environments*](#environments),
- [*Billing & Usage*](#billing--usage),
- [Plans](#plans),
- and [Invoices](#invoices).
### General {#general}
*General* タブでは、次の項目を確認・更新できます。
- *Basic information*:
- Strapi Cloud プロジェクト名(Cloud ダッシュボード、Strapi CLI、デプロイ URL での識別に使用)を確認・変更([プロジェクト名を変更する](#renaming-project) を参照)
- ホスティングリージョン(プロジェクト・データ・リソースを保持するサーバーの地理的な配置)を確認。リージョンは作成時に決まり([プロジェクト作成](/cloud/getting-started/deployment) を参照)、後から変更できません。
- Production アプリ内部名や Subscription ID など、デバッグやサポートで役立つメタデータを確認
- *Strapi CMS license key*: Cloud プロジェクト上で CMS 機能を有効化(ライセンス購入は [Pricing page](https://strapi.io/pricing-self-hosted) を参照)
- *Connected Git repository*: プロジェクトで使うリポジトリとブランチを変更([Git リポジトリとブランチを変更する](#modifying-git-repository--branch) を参照)。`deploy on push` の有効/無効も切り替え可能
- *Danger zone*:
- *Transfer ownership*: 既存メンテナーへオーナー権限を移譲([プロジェクト所有権を移譲する](#transferring-project-ownership) を参照)
- *Delete project*: Strapi Cloud プロジェクトを恒久的に削除([Strapi Cloud プロジェクトを削除する](#deleting-a-strapi-cloud-project) を参照)
#### プロジェクト名を変更する {#renaming-project}
プロジェクト名は作成時に設定されますが([プロジェクト作成](/cloud/getting-started/deployment) を参照)、後からプロジェクト設定で変更できます。
1. *General* タブの *Basic information* セクションで、編集 ボタンをクリックします。
2. ダイアログの *Project name* 入力欄に、新しいプロジェクト名を入力します。
3. **Rename** をクリックして変更を確定します。
#### Adding a CMS license key {#adding-cms-license-key}
CMS ライセンスキーを Strapi Cloud プロジェクトに紐づけると、すべての環境で追加の Strapi CMS 機能を利用できます。利用可能な機能は購入したライセンス種別に依存します。詳細や購入は を参照してください。
:::note
*Strapi CMS license key* セクションが表示されない場合、契約がレガシープランでカスタム CMS ライセンスをサポートしていない可能性があります。その場合は、プロジェクトにライセンスが自動付与済みです。
:::
1. *Strapi CMS license key* セクションで **Add license** をクリックします。
2. ダイアログの入力欄にライセンスキーを貼り付けます。
3. **Save & deploy** をクリックして反映します。
Strapi Cloud プロジェクトから CMS ライセンスを外すには、**Unlink license** をクリックします。解除すると、そのライセンスで使っていた CMS 機能にもアクセスできなくなります。
:::note
ライセンスキーはプロジェクト内の全環境に適用されます。
:::
#### Git リポジトリとブランチを変更する {#modifying-git-repository--branch}
Strapi Cloud プロジェクトの GitHub/GitLab リポジトリ、ブランチ、ベースディレクトリは、プロジェクト作成時に設定されます([プロジェクト作成](/cloud/getting-started/deployment) を参照)。作成後も、プロジェクト設定からリポジトリ更新や Git プロバイダー切り替えが可能です。
:::caution
誤ったリポジトリを選択した場合や、新旧リポジトリでデータスキーマが一致しない場合、プロジェクトやデータが失われる可能性があります。
:::
1. *General* タブの *Connected git repository* セクションで **Update repository** をクリックします。別画面に遷移します。
2. (任意)リポジトリ更新だけでなく Git プロバイダーも切り替える場合は、画面右上の **Switch Git provider** をクリックします。選択した Git プロバイダーの認可画面を経由後、*Update repository* 画面に戻ります。
3. *Update repository* セクションで次の 2 項目を設定します。
| 設定項目 | 手順 |
| --- | --- |
| Account | ドロップダウンからアカウントを選択します。 |
| Repository | ドロップダウンからリポジトリを選択します。 |
4. *Select Git branches* セクションで、環境ごとの設定を入力します。ブランチは各環境の設定画面でも変更できます([Environments](#environments) を参照)。
| 設定項目 | 手順 |
| --- | --- |
| Branch | ドロップダウンからブランチを選択します。 |
| Base directory | 入力欄にベースディレクトリのパスを入力します。 |
| Auto-deploy | チェックすると、対象ブランチに新規コミットがプッシュされるたびに自動デプロイします。無効化する場合はチェックを外します。 |
5. **Save & deploy** をクリックして変更を反映します。
#### プロジェクト所有権を移譲する {#transferring-project-ownership}
Strapi Cloud プロジェクトの所有権は、対象ユーザーがメンテナーであれば移譲できます。現在のオーナーが開始することも、メンテナーが申請することもできます。移譲が完了すると、新しいオーナーが再移譲するまで有効です。
:::prerequisites
所有権を移譲するには、次の条件を満たす必要があります。
- プロジェクトが有料プランで、期限切れカードや未払い請求がないこと
- メンテナーが請求情報を入力済みであること
- 当該プロジェクトで保留中の所有権移譲がないこと
サブスクリプション更新日(毎月 1 日)当日の移譲は失敗する場合があります。その日に失敗し、かつ前提条件を満たしている場合は、数時間待ってから再試行してください。
:::
1. *General* タブの *Danger zone* で **Transfer ownership** をクリックします。
2. ダイアログで操作します。
- オーナーの場合: 対象メンテナーの行で **...** > **Transfer ownership** をクリックします。
- メンテナーの場合: 自分の行で **...** > **Transfer ownership** をクリックします。
3. 新しいダイアログで **Transfer ownership** をクリックし、移譲/申請を確定します。
両ユーザーにメールが送信されます。移譲する側または受け取る側は、メール内の **Confirm transfer** をクリックして確定します。完了後、旧オーナーへ完了通知メールが届きます。
:::tip
移譲または申請が確定されるまでは、メンテナー選択と同じダイアログからキャンセルできます。
:::
:::note
所有権移譲後、プロジェクトは Strapi Cloud から一度切断されます。新しいオーナーは、プロジェクト設定の *General* タブから再接続してください。
:::
#### Strapi Cloud プロジェクトを削除する {#deleting-a-strapi-cloud-project}
Strapi Cloud プロジェクトは削除できますが、操作は恒久的で元に戻せません。関連ドメイン、デプロイ、データは削除され、サブスクリプションは自動解約されます。
1. *General* タブの *Danger zone* で **Delete project** をクリックします。
2. ダイアログで削除理由を選択します。
3. **Delete project** をクリックして削除を確定します。
### Environments {#environments}
*Environments* タブでは、設定済み環境の一覧確認と新規環境の作成ができます。Production は既定環境で削除できません。その他の環境は契約プランの範囲内で追加でき、Strapi Cloud プロジェクトを分離環境で安全に運用できます(例: 本番前に検証する staging 環境)。
:::note
追加環境の課金サイクルは、契約プランの課金サイクルに合わせられます。
:::
新しい環境を作成する手順:
1. **Add a new environment** をクリックします。
2. セットアップ画面で設定を入力します。
| 設定項目 | 手順 |
| --- | --- |
| Environment name | (必須)新しい環境名を入力します。 |
| Git branch | (必須)新しい環境に紐づけるブランチを選択します。 |
| Base directory | 新しい環境のベースディレクトリ名を入力します。 |
| Deploy on push | チェックすると、選択ブランチへ変更がプッシュされたときに自動でデプロイします。無効時は最新変更を手動デプロイします。 |
| Import variables | チェックすると既存環境から変数名のみ取り込みます。値は取り込まれず空欄のままです。 |
3. **Confirm** をクリックしてチェックアウト手順へ進みます。
4. 環境料金、適用税額、日割り調整を確認します。
5. **Add environment** をクリックして環境を作成します。*Project dashboard* に戻り、新しい環境の作成状況と初回デプロイを確認できます。
:::note
環境作成中にエラーが発生すると、進行表示が停止しエラーメッセージが表示されます。失敗したステップの横に **Retry** が表示されるため、作成処理を再開できます。
:::
### Billing & Usage {#billing--usage}
*Billing & Usage* タブでは、次回の見込み請求額、現在のサブスクリプション情報、プロジェクト利用状況の詳細サマリーを確認できます。ここから新しい環境の追加も可能です([Environments](#environments) を参照)。
このタブでは次の操作もできます。
- **Change** をクリックして *Plans* タブへ移動し、サブスクリプションプランや請求サイクルを変更([関連ドキュメント](#plans) を参照)
- **Edit** をクリックして支払い方法を変更([関連ドキュメント](/cloud/account/account-billing) を参照)
:::note
このページで支払い方法を直接選択すると、プロジェクト専用のカードを紐づけられます。プロジェクトごとに別のカードでサブスクリプション管理が可能です。
:::
:::tip
*Billing & Usage* タブの Usage セクションでは、現在の月次利用量と契約上限を比較できます。右上の矢印を使うと、任意の月の利用状況を確認できます。
利用状況から別プランの方が適していると判断された場合は、 *Billing & Usage* タブに切り替え候補プランの案内が表示されます。
:::
### Plans {#plans}
*Plans* タブでは、利用可能な Strapi Cloud プラン一覧を確認でき、現在のプランや請求サイクルを変更できます。
:::info
現在のプランが *legacy* と表示されている場合、新しいプランへサイドグレードできます([ダウングレード](#downgrading-to-another-plan) 参照)。サイドグレード後は、以前のプランには戻れません。
:::
#### 別プランへアップグレードする {#upgrading-to-another-plan}
プランのアップグレードは即時反映され、プロジェクト設定から管理できます。
現在プランを上位プランにアップグレードする手順:
1. プロジェクト設定の *Plans* タブで、月額/年額を選び、アップグレード先プランの **Upgrade** をクリックします。
2. 表示された画面で支払い詳細とアップグレード条件を確認します。
a. (任意)**Edit** をクリックして別の支払い方法を選択します。
b. (任意)**I have a discount code** をクリックし、割引コードを入力して **Apply** をクリックします。
3. **Upgrade to [plan name]** をクリックして確定します。プロジェクトは自動で再デプロイされます。
#### 別プランへダウングレードする {#downgrading-to-another-plan}
プランのダウングレードは、プロジェクト設定で管理できます。ただし即時反映ではなく、現在の請求期間終了まで現プランが継続します。
:::caution
ダウングレード前に、必ず Strapi Cloud プロジェクトの利用状況を確認してください。現在の利用量が下位プラン上限を超える場合、超過料金が発生する可能性があります。機能制限も発生し、たとえば Essential へ下げるとプロジェクトのバックアップは利用できなくなります。詳細は [課金と利用状況](/cloud/getting-started/usage-billing) を参照してください。
追加の有料環境がある場合はダウングレードできません。まず、プラン基本料金に含まれない追加環境をすべて削除する必要があります([環境のリセットと削除](#resetting--deleting-environment) を参照)。Scale から Pro へ下げる場合、追加で含まれていた環境はダウングレード反映時に自動削除されます。
GitHub Organization のリポジトリが接続されている場合、Free プランへはダウングレードできません。先に [Connected Git repository](#modifying-git-repository--branch) 設定で個人リポジトリへ切り替えてください。
:::
現在プランを下位プランにダウングレードする手順:
1. プロジェクト設定の *Plans* タブで月額/年額を選び、ダウングレード先プランの **Downgrade** をクリックします。
2. 表示された画面でダウングレード条件を確認します。
3. **Downgrade** をクリックして確定します。プロジェクトは自動で再デプロイされます。
:::tip
ダウングレードは現在の請求期間終了時に反映されます。反映待ちの間は予約したダウングレードをキャンセルし、現プランを継続できます。
:::
#### 請求サイクルを変更する
プロジェクトの請求サイクルは、月額と年額をいつでも切り替えられます。プランとアドオンは請求サイクルに応じて月額/年額課金されますが、超過料金は常に月額課金です。
請求サイクルを変更する手順:
1. プロジェクト設定の *Plans* タブで、プラン一覧上部のトグルから月額/年額を切り替えます。
2. 現在プランの **Switch to [monthly/yearly] billing** をクリックします。
3. 表示された画面で請求サイクル変更条件を確認します。
4. **Confirm switch** をクリックして確定します。
:::note
年額から月額へ切り替える場合、次回更新日までは年額サイクルが継続します。反映待ちの間は予約した変更をキャンセル可能です。月額から年額への切り替えは即時反映されます。
:::
### Invoices {#invoices}
*Invoices* タブでは、Strapi Cloud プロジェクトの請求書一覧とステータスを確認できます。Free プランでは請求書は発行されません。
:::strapi 請求書はプロフィール設定からも確認できます。
*Profile > Invoices* タブでは、全プロジェクトの請求書一覧を確認できます。詳細は [専用ドキュメント](/cloud/account/account-billing#account-invoices) を参照してください。
:::
## 環境ごとの設定
環境設定では、まずドロップダウンで設定対象の環境を選択します。選択環境に応じて 3〜4 個のタブが表示されます。
- [*Configuration*](#configuration),
- [*Backups*](#backups)(Production 環境のみ利用可能),
- [*Domains*](#domains),
- and [*Variables*](#variables).
### Configuration {#configuration}
*Configuration* タブでは次を確認・更新できます。
- *Basic information*:
- 環境名(作成時に決まり、後から変更不可)
- Node バージョン([Node バージョンを変更する](#modifying-node-version) を参照)
- デバッグやサポートで役立つアプリ内部名
- *Connected branch*: 環境で使う GitHub ブランチを変更([Git ブランチを編集する](#editing-git-branch) を参照)。`deploy on push` の有効/無効も切り替え可能
- *Environment data*: 同一プロジェクト内の別環境からデータ移行([環境間でデータを移行する](#transferring-data-between-environments) を参照)
- *Danger zone*: 環境のリセットまたは恒久削除([環境をリセット/削除する](#resetting--deleting-environment) を参照)
#### Node バージョンを変更する {#modifying-node-version}
環境の Node バージョンは、プロジェクト作成時に高度な設定で選んだ値を基準にします([プロジェクト作成](/cloud/getting-started/deployment) を参照)。作成後も各環境で別の Node バージョンへ切り替え可能です。
1. *Configuration* タブの *Basic information* セクションで、*Node version* の編集 ボタンをクリックします。
2. ダイアログの *Node version* ドロップダウンで使用バージョンを選びます。
3. **Save** をクリックします。すぐ反映する場合は **Save & deploy** をクリックします。
:::tip
デプロイ前に、Strapi プロジェクトで設定した Node バージョンと、プロジェクトダッシュボードに表示される Node バージョンが一致していることを確認してください。
:::
#### Git ブランチを編集する {#editing-git-branch}
1. *Edit branch* ダイアログで設定を編集します。ブランチはプロジェクト設定側から全環境一括でも編集できます([General](#general) を参照)。
| 設定項目 | 手順 |
| --- | --- |
| Selected branch | (必須)ドロップダウンからブランチを選択します。 |
| Base directory | 入力欄にベースディレクトリのパスを入力します。 |
| Deploy the project on every commit pushed to this branch | チェックすると、対象ブランチへのコミットごとに自動デプロイします。無効化する場合はチェックを外します。 |
2. **Save & deploy** をクリックして反映します。
#### Transferring data between environments {#transferring-data-between-environments}
データ移行機能を使うと、同一 Strapi Cloud プロジェクト内で、ある環境から別環境へ CMS コンテンツ全体(データベースとアセット)を移行できます。最新の本番データで検証したい場合や、本番反映前にステージング環境で準備する場合に有用です。
現在、環境間データ移行には次の制限があります。
- 移行先にできるのはセカンダリ環境のみ(Production 環境は不可)
- 移行の開始と進行中移行の管理はプロジェクトオーナーのみ可能
- 一時停止中プロジェクトでは移行を開始不可
:::caution Data transfers are destructive
環境へデータ移行すると、移行先環境の既存データとアセットはすべて恒久的に上書きされます。移行元環境データは影響を受けず、移行中も CMS へアクセスできます。環境設定(変数、ドメインなど)は移行対象外です。
:::
セカンダリ環境へデータ移行する手順:
1. 移行元と移行先の [環境](#environments) を作成し、デプロイします。
2. *Configuration* タブの *Environment data* セクションで **Import data** をクリックします。
3. モーダルで移行元環境をドロップダウンから選択します。移行元に選べるのは、作成とデプロイが完了した環境のみです。
4. **Import data** をクリックして進み、表示手順に従って移行を確定します。
5. 開始後は環境ダッシュボードへ遷移し、進行状況を確認できます。移行完了後、ダッシュボードが更新され、進行中/過去のデプロイが表示されます。
:::note
移行中は移行先環境の CMS にアクセスできません。進行中移行はキャンセルできますが、移行先環境は空の状態になります。移行中にエラーが発生した場合は、再試行またはキャンセルを選べます。
:::
#### 環境をリセット/削除する {#resetting--deleting-environment}
Strapi Cloud プロジェクトの追加環境はリセットまたは削除できますが、操作は恒久的で元に戻せません。既定の Production 環境はリセットも削除もできません。
##### 環境をリセットする
環境をリセットすると、その環境のデータはすべて削除され、変数は既定値に戻ります。手順:
1. *Configuration* タブの *Danger zone* で **Reset environment** をクリックします。
2. 開いたダイアログで **Continue** をクリックし、環境リセットを確定します。
3. リセット用の項目を入力します。
| 設定項目 | 手順 |
| --- | --- |
| Environment name | (必須)環境名を入力します。 |
| Git branch | (必須)ドロップダウンからブランチを選択します。 |
| Base directory | 入力欄にベースディレクトリのパスを入力します。 |
| Import variables | チェックすると既存環境から変数名のみ取り込みます。値は取り込まれず空欄のままです。 |
| Auto-deploy | チェックすると、対象ブランチへのコミットごとに自動デプロイします。無効化する場合はチェックを外します。 |
4. **Reset** をクリックします。
##### 環境を削除する
1. *Configuration* タブの *Danger zone* で **Delete environment** をクリックします。
2. 入力欄に *Environment name* を入力します。
3. **Delete environment** をクリックして削除を確定します。
### Backups {#backups}
*Backups* タブでは、最新バックアップの日時とステータスを確認できます。Strapi Cloud プロジェクトのデータベースは自動バックアップされます(Pro は週次、Scale は日次)。バックアップ保持期間は 28 日です。加えて、手動バックアップを 1 件作成できます。
:::note Notes
- Free または Essential プランではバックアップ機能を利用できません。自動バックアップや手動バックアップを使うには Pro または Scale へアップグレードしてください。
- バックアップ対象は既定の Production 環境データベースのみです。アップロード済みアセットやセカンダリ環境データベースは含まれません。
- 手動バックアップ機能は、プロジェクトの初回デプロイ成功後しばらくして利用可能になります。
:::
:::tip
2023 年 10 月のバックアップ機能リリース前に作成されたプロジェクトでは、次回デプロイ時に初回バックアップが自動実行されます。
:::
#### 手動バックアップを作成する {#creating-a-manual-backup}
手動バックアップを作成するには、 *Backups* セクションで **Create backup** をクリックします。
手動バックアップはすぐ開始され、完了まで復元やほかのバックアップ作成はできません。
:::caution
新しい手動バックアップを作成すると、既存の手動バックアップは削除されます。手動バックアップは常に 1 件のみ保持できます。
:::
#### バックアップを復元する
プロジェクトのバックアップを復元する手順:
1. *Backups* セクションで **Restore backup** をクリックします。
2. ダイアログの *Choose backup* ドロップダウンで、利用可能なバックアップ(自動または手動)を選択します。
3. ダイアログの **Restore** をクリックします。復元が完了すると、選択バックアップ時点の状態に戻ります。 *Backups* タブで復元時刻と復元元バックアップを確認できます。
4. 最終復元完了時刻が表示され、最終復元タイミングを追跡できます。
#### バックアップをダウンロードする
プロジェクトのバックアップをダウンロードする手順:
1. *Backups* セクションで **Download backup** をクリックします。
2. ダイアログの *Choose backup* ドロップダウンで、利用可能なバックアップ(自動または手動)を選択します。
3. ダイアログの **Download** をクリックし、選択したバックアップを `.sql` 形式でダウンロードします。
:::note
バックアップファイルに含まれるのは既定 Production 環境のデータベースのみです。アセットや他環境のデータベースは含まれません。
:::
### Domains {#domains}
*Domains* タブでは、ドメイン管理と新規接続ができます。
*Domains* タブには、Strapi Cloud プロジェクトで使用中のドメイン一覧が表示されます。各ドメインについて次を実行できます。
- 現在ステータスを確認
- Active: ドメイン確認済みで利用中
- Pending: ドメイン移管処理中(DNS 反映待ち)
- Failed: エラーによりドメイン変更要求が失敗
- 編集ボタンでドメイン設定を開く
- 削除ボタンでドメインを削除する
#### カスタムドメインを接続する {#connecting-a-custom-domain}
既定ドメイン名は、ランダムな 2 語とハッシュ値で構成されます。任意のカスタムドメインに置き換え可能です。
:::note
カスタムドメインは Free プランでは利用できません。Free へダウングレードすると、アプリケーションドメインは既定ドメインへ戻ります。
:::
1. **Connect new domain** をクリックします。
2. 開いた画面で次の項目を入力します。
| 設定項目 | 手順 |
| --- | --- |
| Domain name | 新しいドメイン名を入力します(例: *custom-domain-name.com*)。 |
| Hostname | ホスト名(エンドユーザーがブラウザ入力または API 呼び出しで利用するアドレス)を入力します。 |
| Target | ターゲット(Hostname 指定時に実際に転送されるアドレス)を入力します。 |
| Set as default domain | チェックすると、新しいドメインを既定ドメインに設定します。 |
3. **Save & deploy** をクリックして反映します。
:::tip
カスタムドメイン設定を完了するには、ドメインレジストラまたはホスティング側設定で、Target 値(例: `proud-unicorn-123456af.strapiapp.com`)を DNS レコードに CNAME として追加してください。
:::
:::info カスタムドメインとアセット URL
カスタムドメインを使っても、アップロード済みアセット URL には適用されません。アセットは Strapi Cloud のプロジェクトベース URL を維持します。
たとえばカスタムドメインが `https://my-custom-domain.com` で、Strapi Cloud プロジェクト名が `my-strapi-cloud-instance` の場合、API は `https://my-strapi-cloud-instance.media.strapiapp.com/example.png` のような URL を返します。
REST/GraphQL のメディアライブラリクエリは、常に Strapi Cloud のプロジェクトメディアドメインを返します。セルフホスト環境から移行した場合、メディア URL は独自ドメインや CDN と一致しなくなります。API が返す絶対 URL をそのまま利用するか、フロントエンド側で Strapi Cloud メディアドメインを許可してください(詳細は [Cloud Fundamentals](/cloud/cloud-fundamentals) を参照)。
:::
### Variables
Environment variables (more information in the [CMS Documentation](/cms/configurations/environment)) are used to configure the environment of your Strapi application, such as the database connection.
In the *Variables* tab are listed both the default and custom environment variables for your Strapi Cloud project. Each variable is composed of a *Name* and a *Value*.
#### 環境変数を管理する
既定/カスタムの各環境変数にカーソルを合わせると、次の操作が表示されます。
- **Show value**: `*` を実際の変数値表示に切り替えます。
- **Copy to clipboard**: 変数値をコピーします。
- **Actions**: Edit と Delete を表示します。
- 既定変数の編集時は *Name* を変更できず、*Value* は Generate value による自動生成のみ可能です。**Save**(または即時反映する **Save & deploy**)を押してください。
- カスタム変数の編集時は *Name* / *Value* の両方を直接入力または Generate value で変更できます。**Save**(または即時反映する **Save & deploy**)を押してください。
- 変数削除時は確認が表示されます。**Save**(または即時反映する **Save & deploy**)で確定します。
:::tip
検索バーを使うと、一覧から目的の環境変数をすばやく見つけられます。
:::
#### カスタム環境変数を作成する
Strapi Cloud プロジェクトにはカスタム環境変数を作成できます。環境変数を作成・編集した後は、必ずプロジェクトを再デプロイしてください。
1. *Custom environment variables* セクションで **Add variable** をクリックします。
2. 新しい環境変数の *Name* と *Value* を入力します。 アイコンで名前と値を自動生成することもできます。
3. (任意)**Add another** をクリックすると、続けて複数のカスタム環境変数を作成できます。
4. **Save** をクリックして作成を確定します。すぐ反映する場合は **Save & deploy** をクリックします。
# Admin panel customization
Source: https://docs.strapi.io/cms/admin-panel-customization
# Admin panel customization
The **front-end part of Strapi** is called the admin panel. The admin panel presents a graphical user interface to help you structure and manage the content that will be accessible through the Content API. To get an overview of the admin panel, please refer to the [Getting Started > Admin panel](/cms/features/admin-panel) page.
From a developer point of view, Strapi's admin panel is a React-based single-page application that encapsulates all the features and installed plugins of a Strapi application.
Admin panel customization is done by tweaking the code of the `src/admin/app` file or other files included in the `src/admin` folder (see [project structure](/cms/project-structure)). By doing so, you can:
- Customize some parts of the admin panel to better reflect your brand identity (logos, favicon) or your language,
- Replace some other parts of the admin panel, such as the Rich text editor and the bundler,
- Extend the theme or the admin panel to add new features or customize the existing user interface.
:::strapi Plugins and Admin Panel API
In addition to supported customizations detailed in this section, you can go further and create plugins that tap into the [Admin Panel API](/cms/plugins-development/admin-panel-api).
:::
## General considerations
:::prerequisites
Before updating code to customize the admin panel:
- Rename the default `app.example.tsx|js` file into `app.ts|js`.
- Create a new `extensions` folder in `/src/admin/`.
- If you want to see your changes applied live while developing, ensure the admin panel server is running (it's usually done with the `yarn develop` or `npm run develop` command if you have not changed the default [host, port, and path](/cms/configurations/admin-panel#admin-panel-server) of the admin panel).
:::
Most basic admin panel customizations will be done in the `/src/admin/app` file, which includes a `config` object.
Any file used by the `config` object (e.g., a custom logo) should be placed in a `/src/admin/extensions/` folder and imported inside `/src/admin/app.js`.
This will replace the folder's content located at `./build`. Visit
## Basic example
The following is an example of a basic customization of the admin panel:
:::strapi Detailed examples in the codebase
* You can see the full translation keys, for instance to change the welcome message, [on GitHub](https://github.com/strapi/strapi/blob/develop/packages/core/admin/admin/src/translations).
* Light and dark colors are also found [on GitHub](https://github.com/strapi/design-system/tree/main/packages/design-system/src/themes).
:::
# Admin panel bundlers
Source: https://docs.strapi.io/cms/admin-panel-customization/bundlers
# Admin panel bundlers
Strapi's [admin panel](/cms/admin-panel-customization) is a React-based single-page application that encapsulates all the features and installed plugins of a Strapi application. 2 different bundlers can be used with your Strapi 5 application, [Vite](#vite) (the default one) and [webpack](#webpack). Both bundlers can be configured to suit your needs.
:::info
For simplification, the following documentation mentions the `strapi develop` command, but in practice you will probably use its alias by running either `yarn develop` or `npm run develop` depending on your package manager of choice.
:::
## Vite
In Strapi 5,
## Webpack
In Strapi 5, the default bundler is Vite. To use
# Admin panel extension
Source: https://docs.strapi.io/cms/admin-panel-customization/extension
# Admin panel extension
Strapi's [admin panel](/cms/admin-panel-customization) is a React-based single-page application that encapsulates all the features and installed plugins of a Strapi application. If the [customization options](/cms/admin-panel-customization#available-customizations) provided by Strapi are not enough for your use case, you will need to extend Strapi's admin panel.
Extending Strapi's admin panel means leveraging its React foundation to adapt and enhance the interface and features according to the specific needs of your project, which might imply creating new components or adding new types of fields.
There are 2 use cases where you might want to extend the admin panel:
| Approach | Scope | Entry point | Docs |
|---|---|---|---|
| Local extension | One Strapi project | `/src/admin/app.(js\|ts)` and `/src/admin/extensions/` | [Admin panel customization](/cms/admin-panel-customization) |
| Plugin extension | Any project that installs your plugin | `[plugin-name]/admin/src/index.(js\|ts)` | [Admin Panel API overview](/cms/plugins-development/admin-panel-api) |
- As a Strapi plugin developer, you want to develop a Strapi plugin that extends the admin panel **everytime it's installed in any Strapi application**.
👉 This can be done by taking advantage of the [Admin Panel API for plugins](/cms/plugins-development/admin-panel-api), which lets you add navigation links and settings sections, inject React components into predefined areas, manage state with Redux, extend the Content Manager's Edit and List views, and more.
- As a Strapi developer, you want to develop a unique solution for a Strapi user who only needs to extend a specific instance of a Strapi application.
👉 This can be done by directly updating the `/src/admin/app` file, which can import any file located in `/src/admin/extensions`.
## When to consider a plugin instead
Starting with a direct customization in `/src/admin/app` is the right default for project-specific needs. Consider moving to a plugin-based approach when one or more of these signals appear:
- You are duplicating the same admin customization across several Strapi projects.
- You want to version and distribute the extension — either internally or through the .
- You need stronger automated testing independent from a single project codebase.
- Multiple teams need shared ownership and release management for the same extension.
For a full introduction to plugin development, see [Developing Strapi plugins](/cms/plugins-development/developing-plugins).
:::strapi Additional resources
* If you're looking for ways of replacing the default Rich text editor, refer to the [corresponding page](/cms/admin-panel-customization/wysiwyg-editor).
* To understand how plugins integrate with the Strapi admin panel, start with the [Admin Panel API overview](/cms/plugins-development/admin-panel-api).
:::
# Favicon
Source: https://docs.strapi.io/cms/admin-panel-customization/favicon
# Favicon
Strapi's [admin panel](/cms/admin-panel-customization) displays its branding on various places, including the [logo](/cms/admin-panel-customization/logos) and the favicon. Replacing these images allows you to match the interface and application to your identity.
There are 2 approaches to replacing the favicon:
* Replace the `favicon.png` file at the root of a Strapi project
* Edit the [`strapi::favicon` middleware configuration](/cms/configurations/middlewares#favicon) with the following code:
```js title="/config/middlewares.js"
// …
{
name: 'strapi::favicon',
config: {
path: 'my-custom-favicon.png',
},
},
// …
```
Once done, rebuild, launch and revisit your Strapi app by running `yarn build && yarn develop` in the terminal.
:::caution
Make sure that the cached favicon is cleared. It can be cached in your web browser and also with your domain management tool like Cloudflare's CDN.
:::
# Homepage customization
Source: https://docs.strapi.io/cms/admin-panel-customization/homepage
# Homepage customization
The
:::note The API requires Strapi 5.13+
The `app.widgets.register` API only works with Strapi 5.13 and above. Trying to call the API with older versions of Strapi will crash the admin panel.
Plugin developers who want to register widgets should either:
- set `^5.13.0` as their `@strapi/strapi` peerDependency in their plugin `package.json`. This peer dependency powers the Marketplace's compatibility check.
- or check if the API exists before calling it:
```js
if ('widgets' in app) {
// proceed with the registration
}
```
The peerDependency approach is recommended if the whole purpose of the plugin is to register widgets. The second approach makes more sense if a plugin wants to add a widget but most of its functionality is elsewhere.
:::
#### Widget API reference
The `app.widgets.register()` method can take either a single widget configuration object or an array of configuration objects. Each widget configuration object can accept the following properties:
| Property | Type | Description | Required |
|-------------|------------------------|-------------------------------------------------------|----------|
| `icon` | `React.ComponentType` | Icon component to display beside the widget title | Yes |
| `title` | `MessageDescriptor` | Title for the widget with translation support | Yes |
| `component` | `() => Promise
:::tip
For simplicity, the example below uses data fetching directly inside a useEffect hook. While this works for demonstration purposes, it may not reflect best practices in production.
For more robust solutions, consider alternative approaches recommended in the [React documentation](https://react.dev/learn/build-a-react-app-from-scratch#data-fetching). If you're looking to integrate a data fetching library, we recommend using [TanStackQuery](https://tanstack.com/query/v3/).
:::
**Data management**:
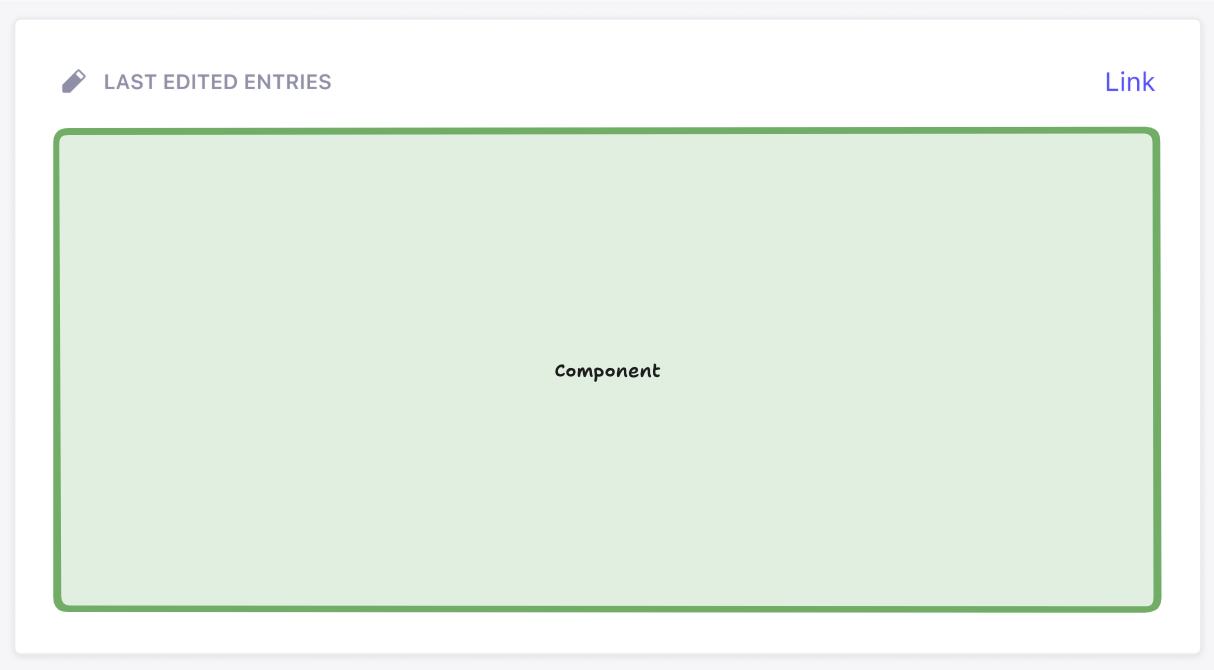
The green box above represents the area where the user’s React component (from `widget.component` in the [API](#widget-api-reference)) is rendered. You can render whatever you like inside of this box. Everything outside that box is, however, rendered by Strapi. This ensures overall design consistency within the admin panel. The `icon`, `title`, and `link` (optional) properties provided in the API are used to display the widget.
#### Widget helper components reference
Strapi provides several helper components to maintain a consistent user experience across widgets:
| Component | Description | Usage |
|------------------|-----------------------------------------------------|--------------------------------------|
| `Widget.Loading` | Displays a loading spinner and message | When data is being fetched |
| `Widget.Error` | Displays an error state | When an error occurs |
| `Widget.NoData` | Displays when no data is available | When the widget has no data to show |
| `Widget.NoPermissions` | Displays when user lacks required permissions | When the user cannot access the widget |
These components help maintain a consistent look and feel across different widgets.
You could render these components without children to get the default wording: `
))}
);
};
```
The following file defines a custom controller that counts all content-types:
```js title="src/plugins/content-metrics/server/src/controllers/metrics.js"
'use strict';
module.exports = ({ strapi }) => ({
async getContentCounts(ctx) {
try {
// Get all content types
const contentTypes = Object.keys(strapi.contentTypes)
.filter(uid => uid.startsWith('api::'))
.reduce((acc, uid) => {
const contentType = strapi.contentTypes[uid];
acc[contentType.info.displayName || uid] = 0;
return acc;
}, {});
// Count entities for each content type
for (const [name, _] of Object.entries(contentTypes)) {
const uid = Object.keys(strapi.contentTypes)
.find(key =>
strapi.contentTypes[key].info.displayName === name || key === name
);
if (uid) {
// Using the count() method from the Document Service API
const count = await strapi.documents(uid).count();
contentTypes[name] = count;
}
}
ctx.body = contentTypes;
} catch (err) {
ctx.throw(500, err);
}
}
});
```
The following file ensures that the metrics controller is reachable at a custom `/count` route:
```js title="src/plugins/content-metrics/server/src/routes/index.js"
'content-api': {
type: 'content-api',
routes: [
{
method: 'GET',
path: '/count',
handler: 'metrics.getContentCounts',
config: {
policies: [],
},
},
],
},
};
```
))}
);
};
```
The following file defines a custom controller that counts all content-types:
```js title="src/plugins/content-metrics/server/src/controllers/metrics.js"
'use strict';
module.exports = ({ strapi }) => ({
async getContentCounts(ctx) {
try {
// Get all content types
const contentTypes = Object.keys(strapi.contentTypes)
.filter(uid => uid.startsWith('api::'))
.reduce((acc, uid) => {
const contentType = strapi.contentTypes[uid];
acc[contentType.info.displayName || uid] = 0;
return acc;
}, {});
// Count entities for each content type using Document Service
for (const [name, _] of Object.entries(contentTypes)) {
const uid = Object.keys(strapi.contentTypes)
.find(key =>
strapi.contentTypes[key].info.displayName === name || key === name
);
if (uid) {
// Using the count() method from Document Service instead of strapi.db.query
const count = await strapi.documents(uid).count();
contentTypes[name] = count;
}
}
ctx.body = contentTypes;
} catch (err) {
ctx.throw(500, err);
}
}
});
```
The following file ensures that the metrics controller is reachable at a custom `/count` route:
```js title="src/plugins/content-metrics/server/src/routes/index.js"
'content-api': {
type: 'content-api',
routes: [
{
method: 'GET',
path: '/count',
handler: 'metrics.getContentCounts',
config: {
policies: [],
},
},
],
},
};
```
# Locales & translations
Source: https://docs.strapi.io/cms/admin-panel-customization/locales-translations
# Locales & translations
The Strapi [admin panel](/cms/admin-panel-customization) ships with English strings and supports adding other locales so your editorial team can work in their preferred language. Locales determine which languages appear in the interface, while translations provide the text displayed for each key in a locale.
This guide targets project maintainers customizing the admin experience from the application codebase. All examples modify the configuration exported from `/src/admin/app` file, which Strapi loads when the admin panel builds. You'll learn how to declare additional locales and how to extend Strapi or plugin translations when a locale is missing strings.
## Defining locales
To update the list of available locales in the admin panel, set the `config.locales` array in `src/admin/app` file:
:::note Notes
- The `en` locale cannot be removed from the build as it is both the fallback (i.e. if a translation is not found in a locale, the `en` will be used) and the default locale (i.e. used when a user opens the administration panel for the first time).
- The full list of available locales is accessible on
A plugin's key/value pairs are declared independently in the plugin's files at `/admin/src/translations/[language-name].json`. These key/value pairs can similarly be extended in the `config.translations` key by prefixing the key with the plugin's name (i.e. `[plugin name].[key]: 'value'`) as in the following example:
If you need to ship additional translation JSON files—for example to organize large overrides or to support a locale not bundled with Strapi—place them in the `/src/admin/extensions/translations` folder and ensure the locale code is listed in `config.locales`.
:::tip Rebuild the admin
Translation changes apply when the admin rebuilds. If updates don’t show, re-run your dev server or rebuild the admin to refresh bundled translations.
:::
# Logos
Source: https://docs.strapi.io/cms/admin-panel-customization/logos
# Logos
Strapi's [admin panel](/cms/admin-panel-customization) displays its branding on both the login screen and in the main navigation. Replacing these images allows you to match the interface to your identity. The present page shows how to override the two logo files via the admin panel configuration. If you prefer uploading them directly in the UI, see [Customizing the logo](/cms/features/admin-panel#customizing-the-logo).
The Strapi admin panel displays a logo in 2 different locations, represented by 2 different keys in the admin panel configuration:
| Location in the UI | Configuration key to update |
| ---------------------- | --------------------------- |
| On the login page | `config.auth.logo` |
| In the main navigation | `config.menu.logo` |
:::note
Logos uploaded via the admin panel supersede any logo set through the configuration files.
:::
### Logos location in the admin panel
The logo handled by `config.auth.logo` logo is only shown on the login screen:
The logo handled by `config.menu.logo` logo is located in the main navigation at the top left corner of the admin panel:

### Updating logos
To update the logos, put image files in the `/src/admin/extensions` folder, import these files in `src/admin/app` and update the corresponding keys as in the following example:
:::note
There is no size limit for image files set through the configuration files.
:::
# Theme extension
Source: https://docs.strapi.io/cms/admin-panel-customization/theme-extension
# Theme extension
Strapi's [admin panel](/cms/admin-panel-customization) can be displayed either in light or dark mode (see [profile setup](/cms/getting-started/setting-up-admin-panel#setting-up-your-administrator-profile)), and both can be extended through custom theme settings.
To extend the theme, use either:
- the `config.theme.light` key for the Light mode
- the `config.theme.dark` key for the Dark mode
:::strapi Strapi Design System
The default
# Customizing the rich text editor
Source: https://docs.strapi.io/cms/admin-panel-customization/wysiwyg-editor
# Change the default rich text editor
Strapi's [admin panel](/cms/admin-panel-customization) comes with a built-in rich text editor. To change the default editor, several options are at your disposal:
- You can install a third-party plugin, such as one for CKEditor, by visiting .
- You can create your own plugin to create and register a fully custom WYSIWYG field (see [custom fields documentation](/cms/features/custom-fields)).
:::tip Next steps
When evaluating editors, start with a plugin from the Marketplace for a quick trial, then consider a custom field if you need deeper integration (schema, validation, or custom toolbar behavior).
:::
# Strapi Client
Source: https://docs.strapi.io/cms/api/client
# Strapi Client
Strapi Client ライブラリはバックエンドとのやり取りを簡素化し、コンテンツの取得・作成・更新・削除が行えます。このガイドではセットアップ、認証の設定、主な機能の使い方を説明します。
## はじめに
:::prerequisites
- Strapi プロジェクトが作成済みで動いていること。まだの場合は [クイックスタート](/cms/quick-start) に従って作成してください。
- Strapi インスタンスの Content API の URL を把握していること(例: `http://localhost:1337/api`)。
:::
### インストール
Strapi Client をプロジェクトで使うには、好みのパッケージマネージャーで依存関係に追加します。
### 基本的な設定
バックエンドと通信するには、Strapi Client を初期化し、API のベース URL を設定します。
`baseURL` にはプロトコル(`http` または `https`)を含める必要があります。無効な URL の場合は `StrapiInitializationError` がスローされます。
### 認証
Strapi Client は複数の認証方式に対応し、バックエンドの保護されたリソースにアクセスできます。
Strapi で [API トークン](/cms/features/api-tokens) を使っている場合は、次のように設定します。
```js
const client = strapi({
baseURL: 'http://localhost:1337/api',
auth: 'your-api-token-here',
});
```
リクエストに必要な認証情報が自動で付きます。
トークンが無効または欠落している場合、初期化時に `StrapiValidationError` がスローされます。
## API リファレンス
Strapi Client がバックエンドとやり取りするための主なプロパティとメソッドは次のとおりです。
| パラメータ | 説明 |
| ----------| -------------------------------------------------------------------------------------------- |
| `baseURL` | Strapi バックエンドの API ベース URL。 |
| `fetch()` | ネイティブの fetch API に近い、汎用 API リクエスト用のメソッド。 |
| `collection()` | コレクションタイプのリソースを扱います(ブログ記事や商品など)。 |
| `single()` | シングルタイプのリソースを扱います(ホームページ設定や全体設定など)。 |
| `files()` | Strapi メディアライブラリへのファイルのアップロード・取得・管理を行います。 |
### 汎用の fetch
Strapi Client から、初期化時に指定したベース URL を基準にした直接リクエスト用に JavaScript の `fetch` に相当する手段が使えます。
```js
const result = await client.fetch('articles', { method: 'GET' });
```
### コレクションタイプの操作
Strapi のコレクションタイプは複数エントリを持つエンティティです(多数の投稿があるブログなど)。`collection()` で操作し、次のメソッドが使えます。
| パラメータ | 説明 |
| ----------| -------------------------------------------------------------------------------------------- |
| `find(queryParams?)` | フィルター・ソート・ページネーションなどの任意パラメータ付きで複数ドキュメントを取得します。 |
| `findOne(documentID, queryParams?)` | 一意の ID で 1 件のドキュメントを取得します。 |
| `create(data, queryParams?)` | コレクションに新しいドキュメントを作成します。 |
| `update(documentID, data, queryParams?)` | 既存のドキュメントを更新します。 |
| `delete(documentID, queryParams?)` | 既存のドキュメントを削除します。 |
**使用例:**
### シングルタイプの操作
シングルタイプはアプリ内で 1 つだけ存在するコンテンツ(ホームページ設定やサイト全体の設定など)です。`single()` で操作し、次のメソッドが使えます。
| パラメータ | 説明 |
| ----------| -------------------------------------------------------------------------------------------- |
| `find(queryParams?)` | ドキュメントを取得します。 |
| `update(documentID, data, queryParams?)` | ドキュメントを更新します。 |
| `delete(queryParams?)` | ドキュメントを削除します。 |
**使用例:**
```js
const homepage = client.single('homepage');
// 既定のホームページコンテンツを取得
const defaultHomepage = await homepage.find();
// ホームページのスペイン語版を取得
const spanishHomepage = await homepage.find({ locale: 'es' });
// ホームページの下書きを更新
const updatedHomepage = await homepage.update(
{ title: 'Updated Homepage Title' },
{ status: 'draft' }
);
// ホームページのコンテンツを削除
await homepage.delete();
```
### ファイルの操作
Strapi Client は [メディアライブラリ](/cms/features/media-library) に `files` 経由でアクセスします。REST API を直接使わずにファイルのメタデータを取得・管理できます。
ファイル操作用のメソッドは次のとおりです。表のメソッド名をクリックすると、詳細と例のある見出しへ移動します。
| メソッド | 説明 |
|--------|-------------|
| [`find(params?)`](#find) | 任意のクエリパラメータに基づき、ファイルメタデータの一覧を取得します |
| [`findOne(fileId)`](#findone) | ID で 1 件のファイルメタデータを取得します |
| [`update(fileId, fileInfo)`](#update) | 既存ファイルのメタデータを更新します |
| [`upload(file, options)`](#upload) | ファイル(Blob または Buffer)をアップロードします。メタデータ用の任意の `options` を付けられます |
| [`delete(fileId)`](#delete) | ID でファイルを削除します |
#### `find` {#find}
`strapi.client.files.find()` は、任意のクエリパラメータに基づきファイルメタデータの一覧を返します。
次のように使います。
```js
// クライアントを初期化
const client = strapi({
baseURL: 'http://localhost:1337/api',
auth: 'your-api-token',
});
// すべてのファイルメタデータを取得
const allFiles = await client.files.find();
console.log(allFiles);
// フィルターとソート付きでファイルメタデータを取得
const imageFiles = await client.files.find({
filters: {
mime: { $contains: 'image' }, // 画像のみ
name: { $contains: 'avatar' }, // 名前に avatar を含むもののみ
},
sort: ['name:asc'], // 名前の昇順
});
```
#### `findOne` {#findone}
`strapi.client.files.findOne()` は、ID で 1 件のファイルメタデータを返します。
次のように使います。
```js
// クライアントを初期化
const client = strapi({
baseURL: 'http://localhost:1337/api',
auth: 'your-api-token',
});
// ID でファイルメタデータを取得
const file = await client.files.findOne(1);
console.log(file.name);
console.log(file.url);
console.log(file.mime); // ファイルの MIME タイプ
```
#### `update` {#update}
`strapi.client.files.update()` は既存ファイルのメタデータを更新します。引数は `fileId` と、名前・代替テキスト・キャプションなどを含むオプションオブジェクトです。
次のように使います。
```js
// クライアントを初期化
const client = strapi({
baseURL: 'http://localhost:1337/api',
auth: 'your-api-token',
});
// ファイルメタデータを更新
const updatedFile = await client.files.update(1, {
name: 'New file name',
alternativeText: 'Descriptive alt text for accessibility',
caption: 'A caption for the file',
});
```
#### `upload`
##### レスポンスの形
`strapi.client.files.upload()` は、次のようなフィールドを持つファイルオブジェクトの配列を返します。
```json
{
"id": 1,
"name": "image.png",
"alternativeText": "Uploaded from Node.js Buffer",
"caption": "Example upload",
"mime": "image/png",
"url": "/uploads/image.png",
"size": 12345,
"createdAt": "2025-07-23T12:34:56.789Z",
"updatedAt": "2025-07-23T12:34:56.789Z"
}
```
:::note レスポンスの追加フィールド
アップロードのレスポンスには、ここに示した以外のフィールドも含まれます。利用可能なすべてのフィールドはクライアントの を参照してください。
:::
#### `delete` {#delete}
`strapi.client.files.delete()` は ID を指定してファイルを削除します。
次のように使います。
```js
// クライアントを初期化
const client = strapi({
baseURL: 'http://localhost:1337/api',
auth: 'your-api-token',
});
// ID でファイルを削除
const deletedFile = await client.files.delete(1);
console.log('File deleted successfully');
console.log('Deleted file ID:', deletedFile.id);
console.log('Deleted file name:', deletedFile.name);
```
## よくあるエラー
Strapi Client 経由のクエリで次のエラーが発生することがあります。
| エラー | 説明 |
|-------|-------------|
| 権限エラー | 認証されたユーザーにファイルのアップロードや管理の権限がない場合、`FileForbiddenError` がスローされます。 |
| HTTP エラー | サーバーに到達できない、認証に失敗した、ネットワークに問題がある場合、`HTTPError` がスローされます。 |
| パラメータ不足 | `Buffer` をアップロードするとき、`options` に `filename` と `mimetype` の両方が必要です。どちらかが欠けるとエラーになります。 |
:::strapi 追加情報
Strapi Client の詳細はパッケージの を参照してください。
:::
# Content API
Source: https://docs.strapi.io/cms/api/content-api
# コンテンツにアクセスする Strapi API
Strapi プロジェクトを作成・設定し、[コンテンツタイプビルダー](/cms/features/content-type-builder) で構造を作り、[コンテンツマネージャー](/cms/features/content-manager) からデータを追加したら、次はそのコンテンツにアクセスする段階です。
フロントエンドアプリからは、Strapi の Content API を通じてコンテンツへアクセスできます。公開される経路は次のとおりです。
- 既定では [REST API](/cms/api/rest)
- [GraphQL プラグイン](/cms/plugins/graphql) をインストールしていれば [GraphQL API](/cms/api/graphql) も利用可能
REST API とやり取りするには、[Strapi Client](/cms/api/client) ライブラリも利用できます。
REST と GraphQL は、外部アプリに公開される Content API の上位レイヤーです。Strapi には、さらに 2 つの下位 API があります。
- [Document Service API](/cms/api/document-service) は `strapi.documents` から利用でき、[バックエンドサーバー](/cms/customization) や [プラグイン](/cms/plugins-development/developing-plugins) でデータベース操作するときの推奨 API です。Document Service は **document**
# Documents
Source: https://docs.strapi.io/cms/api/document
# Documents
Strapi 5 における **document** は API 上の概念です。document は、あるコンテンツタイプの 1 エントリーに対する複数のバリエーションをまとめたものです。
シングルタイプは 1 つの固有 document を持ち、コレクションタイプは複数の document を持てます。
管理パネル利用時は document という言葉は通常意識しません。ユーザーは [コンテンツマネージャー](/cms/features/content-manager) で **entry** を作成・編集します。例えば、特定ロケールの entry 一覧を見たり、特定ロケールの下書きを編集したりします。
ただし API レベルでは、entry のフィールド値は次のように複数状態を持ちます。
- 英語ロケールとフランス語ロケールで内容が異なる
- 各ロケールで draft 版と published 版が異なる
すべてのロケールにおける draft / published の内容をまとめる単位が document です。
[Document Service API](/cms/api/document-service) で document を操作すると、document 全体、またはその一部データを作成・取得・更新・削除できます。
次の図は、[国際化(i18n)](/cms/features/internationalization) や [Draft & Publish](/cms/features/draft-and-publish) の有効化状態ごとに、コンテンツがどのようなバリエーションを持つかを示します。
- コンテンツタイプで i18n が有効な場合、document は複数の **document locale** を持てます。
- コンテンツタイプで Draft & Publish が有効な場合、document は **published** と **draft** の 2 バージョンを持てます。
:::strapi document データを扱う API
document またはその中のデータを扱うには次を使います。
- バックエンドサーバー側(コントローラー、サービス、プラグインのバックエンド側など)では [Document Service API](/cms/api/document-service) を使う。
- アプリのフロント側では [REST API](/cms/api/rest) または [GraphQL API](/cms/api/graphql) でデータを取得する。
API 全体の説明は [Content API の導入](/cms/api/content-api) を参照してください。
:::
:::info 既定で返るバージョン
バックエンド API とフロント API では、パラメーター未指定時の既定バージョンが異なります。
- Document Service API は既定で draft を返す
- REST / GraphQL API は既定で published を返す
:::
# Document Service API
Source: https://docs.strapi.io/cms/api/document-service
# Document Service API
Document Service API は **Query Engine API** の上に構築されています。 **ドキュメント**
:::strapi Strapi 5 では Entity Service API は非推奨です
Document Service API は Strapi v4 で使われていた Entity Service API に代わります(
`findOne()` は一致するドキュメントがあればそれを返し、なければ `null` を返します。
### `findFirst()` {#findfirst}
パラメータに一致する最初のドキュメントを取得します。
構文: `findFirst(parameters: Params) => Document`
#### パラメータ
| パラメータ | 説明 | 既定値 | 型 |
|-----------|-------------|---------|------|
| [`locale`](/cms/api/document-service/locale#find-first) | 検索対象ドキュメントのロケール。 | 既定ロケール | 文字列または `undefined` |
| [`status`](/cms/api/document-service/status#find-first) | _コンテンツタイプで [下書きと公開](/cms/features/draft-and-publish) が有効な場合_: 公開状態。次のいずれか。
# Backend customization
:::strapi Disambiguation: Strapi back end
As a headless CMS, the Strapi software as a whole can be considered as the "back end" of your website or application.
But the Strapi software itself includes 2 different parts:
- The **back-end** part of Strapi is an HTTP server that Strapi runs. Like any HTTP server, the Strapi back end receives requests and send responses. Your content is stored in a database, and the Strapi back end interacts with the database to create, retrieve, update, and delete content.
- The **front-end** part of Strapi is called the admin panel. The admin panel presents a graphical user interface to help you structure and manage the content.
Throughout this developer documentation, 'back end' refers _exclusively_ to the back-end part of Strapi.
The [Getting Started > Admin panel page](/cms/features/admin-panel) gives an admin panel overview and the [admin panel customization section](/cms/admin-panel-customization) details the various customization options available for the admin panel.
:::
The Strapi back end runs an HTTP server based on , a back-end JavaScript framework.
Like any HTTP server, the Strapi back end receives requests and send responses. You can send requests to the Strapi back end to create, retrieve, update, or delete data through the [REST](/cms/api/rest) or [GraphQL](/cms/api/graphql) APIs.
A request can travel through the Strapi back end as follows:
1. The Strapi server receives a [request](/cms/backend-customization/requests-responses).
2. The request hits [global middlewares](/cms/backend-customization/middlewares) that are run in a sequential order.
3. The request hits a [route](/cms/backend-customization/routes). By default, Strapi generates route files for all the content-types that you create (see [REST API documentation](/cms/api/rest)), and more routes can be added and configured.
4. [Route policies](/cms/backend-customization/policies) act as a read-only validation step that can block access to a route. [Route middlewares](/cms/backend-customization/routes#middlewares) can control the request flow and mutate the request itself before moving forward.
5. [Controllers](/cms/backend-customization/controllers) execute code once a route has been reached. [Services](/cms/backend-customization/services) are optional, additional code that can be used to build custom logic reusable by controllers.
6. The code executed by the controllers and services interacts with the [models](/cms/backend-customization/models) that are a representation of the content content structure stored in the database. Interacting with the data represented by the models is handled by the [Document Service](/cms/api/document-service) and [Query Engine](/cms/api/query-engine).
7. You can implement [Document Service middlewares](/cms/api/document-service/middlewares) to control the data before it's sent to the Query Engine. The Query Engine can also use lifecycle hooks though we recommend you use Document Service middlewares unless you absolutely need to directly interact with the database.
7. The server returns a [response](/cms/backend-customization/requests-responses). The response can travel back through route middlewares and global middlewares before being sent.
Both global and route middlewares include an asynchronous callback function, `await next()`. Depending on what is returned by the middleware, the request will either go through a shorter or longer path through the back end:
* If a middleware returns nothing, the request will continue travelling through the various core elements of the back end (i.e., controllers, services, and the other layers that interact with the database).
* If a middleware returns before calling `await next()`, a response will be immediately sent, skipping the rest of the core elements. Then it will go back down the same chain it came up.
:::info
Please note that all customizations described in the pages of this section are only for the REST API. [GraphQL customizations](/cms/plugins/graphql#customization) are described in the GraphQL plugin documentation.
:::
## Interactive diagram
The following diagram represents how requests travel through the Strapi back end. You can click on any shape to jump to the relevant page in the documentation.
# Controllers
Source: https://docs.strapi.io/cms/backend-customization/controllers
# Controllers
Controllers are JavaScript files that contain a set of methods, called actions, reached by the client according to the requested [route](/cms/backend-customization/routes). Whenever a client requests the route, the action performs the business logic code and sends back the [response](/cms/backend-customization/requests-responses). Controllers represent the C in the model-view-controller (MVC) pattern.
In most cases, the controllers will contain the bulk of a project's business logic. But as a controller's logic becomes more and more complicated, it's a good practice to use [services](/cms/backend-customization/services) to organize the code into re-usable parts.
The diagram represents a simplified version of how a request travels through the Strapi back end, with controllers highlighted. The backend customization introduction page includes a complete, interactive diagram.
:::caution Sanitize inputs and outputs
When overriding core actions, always validate and sanitize queries and responses to avoid leaking private fields or bypassing access rules. Use `validateQuery` (optional), `sanitizeQuery` (recommended), and `sanitizeOutput` before returning data from custom actions. See the example below for a safe `find` override.
:::
## Implementation
Controllers can be [generated or added manually](#adding-a-new-controller). Strapi provides a `createCoreController` factory function that automatically generates core controllers and allows building custom ones or [extend or replace the generated controllers](#extending-core-controllers).
### Adding a new controller
A new controller can be implemented:
- with the [interactive CLI command `strapi generate`](/cms/cli)
- or manually by creating a JavaScript file:
- in `./src/api/[api-name]/controllers/` for API controllers (this location matters as controllers are auto-loaded by Strapi from there)
- or in a folder like `./src/plugins/[plugin-name]/server/controllers/` for plugin controllers, though they can be created elsewhere as long as the plugin interface is properly exported in the `strapi-server.js` file (see [Server API for Plugins documentation](/cms/plugins-development/server-api))
Each controller action can be an `async` or `sync` function.
Every action receives a context object (`ctx`) as a parameter. `ctx` contains the [request context](/cms/backend-customization/requests-responses#ctxrequest) and the [response context](/cms/backend-customization/requests-responses#ctxresponse).
Example: GET /hello route calling a basic controller
A specific `GET /hello` [route](/cms/backend-customization/routes) is defined, the name of the router file (i.e. `index`) is used to call the controller handler (i.e. `index`). Every time a `GET /hello` request is sent to the server, Strapi calls the `index` action in the `hello.js` controller, which returns `Hello World!`:
:::note
When a new [content-type](/cms/backend-customization/models#content-types) is created, Strapi builds a generic controller with placeholder code, ready to be customized.
:::
:::tip
To see a possible advanced usage for custom controllers, read the [services and controllers](/cms/backend-customization/examples/services-and-controllers) page of the backend customization examples cookbook.
:::
### Controllers & Routes: How routes reach controller actions
- Core mapping is automatic: when you generate a content-type, Strapi creates the matching controller and a router file that already targets the standard actions (`find`, `findOne`, `create`, `update`, and `delete`). Overriding any of these actions inside the generated controller does not require touching the router — the route keeps the same handler string and executes your updated logic.
- Adding a route should only be done for new actions or paths. If you introduce a brand-new method such as `exampleAction`, create or update a route entry whose `handler` points to the action so HTTP requests can reach it. Use the fully-qualified handler syntax `::..` (e.g. `api::restaurant.restaurant.exampleAction` for an API controller or `plugin::menus.menu.exampleAction` for a plugin controller).
- Regarding controller and route filenames: the default controller name comes from the filename inside `./src/api/[api-name]/controllers/`. Core routers created with `createCoreRouter` adopt the same name, so the generated handler string matches automatically. Custom routers can follow any file naming scheme, as long as the `handler` string references an exported controller action.
The example below adds a new controller action and exposes it through a custom route without duplicating the existing CRUD route definitions:
```js title="./src/api/restaurant/controllers/restaurant.js"
const { createCoreController } = require('@strapi/strapi').factories;
module.exports = createCoreController('api::restaurant.restaurant', ({ strapi }) => ({
async exampleAction(ctx) {
const specials = await strapi.service('api::restaurant.restaurant').find({ filters: { isSpecial: true } });
return this.transformResponse(specials.results);
},
}));
```
```js title="./src/api/restaurant/routes/01-custom-restaurant.js"
module.exports = {
routes: [
{
method: 'GET',
path: '/restaurants/specials',
handler: 'api::restaurant.restaurant.exampleAction',
},
],
};
```
### Sanitization and Validation in controllers {#sanitization-and-validation-in-controllers}
:::warning
It's strongly recommended you sanitize (v4.8.0+) and/or validate (v4.13.0+) your incoming request query utilizing the new `sanitizeQuery` and `validateQuery` functions to prevent the leaking of private data.
:::
Sanitization means that the object is “cleaned” and returned.
Validation means an assertion is made that the data is already clean and throws an error if something is found that shouldn't be there.
In Strapi 5, both query parameters and input data (i.e., create and update body data) are validated. Any create and update data requests with the following invalid input will throw a `400 Bad Request` error:
- relations the user do not have permission to create
- unrecognized values that are not present on a schema
- non-writable fields and internal timestamps like `createdAt` and `createdBy` fields
- setting or updating an `id` field (except for connecting relations)
#### Sanitization when utilizing controller factories
Within the Strapi factories the following functions are exposed that can be used for sanitization and validation:
| Function Name | Parameters | Description |
|------------------|----------------------------|--------------------------------------------------------------------------------------|
| `sanitizeQuery` | `ctx` | Sanitizes the request query |
| `sanitizeOutput` | `entity`/`entities`, `ctx` | Sanitizes the output data where entity/entities should be an object or array of data |
| `sanitizeInput` | `data`, `ctx` | Sanitizes the input data |
| `validateQuery` | `ctx` | Validates the request query (throws an error on invalid params) |
| `validateInput` | `data`, `ctx` | (EXPERIMENTAL) Validates the input data (throws an error on invalid data) |
These functions automatically inherit the sanitization settings from the model and sanitize the data accordingly based on the content-type schema and any of the content API authentication strategies, such as the Users & Permissions plugin or API tokens.
:::warning
Because these methods use the model associated with the current controller, if you query data that is from another model (i.e., doing a find for "menus" within a "restaurant" controller method), you must instead use the `strapi.contentAPI` methods, such as `strapi.contentAPI.sanitize.query` described in [Sanitizing Custom Controllers](#sanitize-validate-custom-controllers), or else the result of your query will be sanitized against the wrong model.
:::
#### Sanitization and validation when building custom controllers {#sanitize-validate-custom-controllers}
Within custom controllers, Strapi exposes the following functions via `strapi.contentAPI` for sanitization and validation. To add custom query or body parameters to Content API routes (e.g. in `register`), see [Custom Content API parameters](/cms/backend-customization/routes#custom-content-api-parameters).
| Function Name | Parameters | Description |
|------------------------------|--------------------|---------------------------------------------------------|
| `strapi.contentAPI.sanitize.input` | `data`, `schema`, `auth` | Sanitizes the request input including non-writable fields, removing restricted relations, and other nested "visitors" added by plugins |
| `strapi.contentAPI.sanitize.output` | `data`, `schema`, `auth` | Sanitizes the response output including restricted relations, private fields, passwords, and other nested "visitors" added by plugins |
| `strapi.contentAPI.sanitize.query` | `ctx.query`, `schema`, `auth` | Sanitizes the request query including filters, sort, fields, and populate |
| `strapi.contentAPI.validate.query` | `ctx.query`, `schema`, `auth` | Validates the request query including filters, sort, fields (currently not populate) |
| `strapi.contentAPI.validate.input` | `data`, `schema`, `auth` | (EXPERIMENTAL) Validates the request input including non-writable fields, removing restricted relations, and other nested "visitors" added by plugins |
:::note
Depending on the complexity of your custom controllers, you may need additional sanitization that Strapi cannot currently account for, especially when combining the data from multiple sources.
:::
### Extending core controllers {#extending-core-controllers}
Default controllers and actions are created for each content-type. These default controllers are used to return responses to API requests (e.g. when `GET /api/articles/3` is accessed, the `findOne` action of the default controller for the "Article" content-type is called). Default controllers can be customized to implement your own logic. The following code examples should help you get started.
:::tip
An action from a core controller can be replaced entirely by [creating a custom action](#adding-a-new-controller) and naming the action the same as the original action (e.g. `find`, `findOne`, `create`, `update`, or `delete`).
:::
:::tip
When extending a core controller, you do not need to re-implement any sanitization as it will already be handled by the core controller you are extending. Where possible it's strongly recommended to extend the core controller instead of creating a custom controller.
:::
Collection type examples
:::tip
The [backend customization examples cookbook](/cms/backend-customization/examples) shows how you can overwrite a default controller action, for instance for the [`create` action](/cms/backend-customization/examples/services-and-controllers#custom-controller).
:::
Single type examples
## Usage
Controllers are declared and attached to a route. Controllers are automatically called when the route is called, so controllers usually do not need to be called explicitly. However, [services](/cms/backend-customization/services) can call controllers, and in this case the following syntax should be used:
```js
// access an API controller
strapi.controller('api::api-name.controller-name');
// access a plugin controller
strapi.controller('plugin::plugin-name.controller-name');
```
:::tip
To list all the available controllers, run `yarn strapi controllers:list`.
:::
# Middlewares
Source: https://docs.strapi.io/cms/backend-customization/middlewares
# Middlewares customization
Globally scoped custom middlewares should be added to the [middlewares configuration file](/cms/configurations/middlewares#loading-order) or Strapi won't load them.
API level and plugin middlewares can be added into the specific router that they are relevant to like the following:
```js title="./src/api/[api-name]/routes/[collection-name].js or ./src/plugins/[plugin-name]/server/routes/index.js"
module.exports = {
routes: [
{
method: "GET",
path: "/[collection-name]",
handler: "[controller].find",
config: {
middlewares: ["[middleware-name]"],
// See the usage section below for middleware naming conventions
},
},
],
};
```
Example of a custom timer middleware
The GraphQL plugin also allows [implementing custom middlewares](/cms/plugins/graphql#middlewares), with a different syntax.
:::tip Discover loaded middlewares
Run `yarn strapi middlewares:list` to list all registered middlewares and double‑check naming when wiring them in routers.
:::
## Usage
Middlewares are called different ways depending on their scope:
- use `global::middleware-name` for application-level middlewares
- use `api::api-name.middleware-name` for API-level middlewares
- use `plugin::plugin-name.middleware-name` for plugin middlewares
:::tip
To list all the registered middlewares, run `yarn strapi middlewares:list`.
:::
### Restricting content access with an "is-owner policy"
It is often required that the author of an entry is the only user allowed to edit or delete the entry. In previous versions of Strapi, this was known as an "is-owner policy". With Strapi v4, the recommended way to achieve this behavior is to use a middleware.
Proper implementation largely depends on your project's needs and custom code, but the most basic implementation could be achieved with the following procedure:
1. From your project's folder, create a middleware with the Strapi CLI generator, by running the `yarn strapi generate` (or `npm run strapi generate`) command in the terminal.
2. Select `middleware` from the list, using keyboard arrows, and press Enter.
3. Give the middleware a name, for instance `isOwner`.
4. Choose `Add middleware to an existing API` from the list.
5. Select which API you want the middleware to apply.
6. Replace the code in the `/src/api/[your-api-name]/middlewares/isOwner.js` file with the following, replacing `api::restaurant.restaurant` in line 22 with the identifier corresponding to the API you choose at step 5 (e.g., `api::blog-post.blog-post` if your API name is `blog-post`):
```js showLineNumbers title="src/api/blog-post/middlewares/isOwner.js"
"use strict";
/**
* `isOwner` middleware
*/
module.exports = (config, { strapi }) => {
// Add your own logic here.
return async (ctx, next) => {
const user = ctx.state.user;
const entryId = ctx.params.id ? ctx.params.id : undefined;
let entry = {};
/**
* Gets all information about a given entry,
* populating every relations to ensure
* the response includes author-related information
*/
if (entryId) {
entry = await strapi.documents('api::restaurant.restaurant').findOne(
entryId,
{ populate: "*" }
);
}
/**
* Compares user id and entry author id
* to decide whether the request can be fulfilled
* by going forward in the Strapi backend server
*/
if (user.id !== entry.author.id) {
return ctx.unauthorized("This action is unauthorized.");
} else {
return next();
}
};
};
```
7. Ensure the middleware is configured to apply on some routes. In the `config` object found in the `src/api/[your-api–name]/routes/[your-content-type-name].js` file, define the action keys (`find`, `findOne`, `create`, `update`, `delete`, etc.) for which you would like the middleware to apply, and declare the `isOwner` middleware for these routes.
For instance, if you wish to allow GET requests (mapping to the `find` and `findOne` actions) and POST requests (i.e., the `create` action) to any user for the `restaurant` content-type in the `restaurant` API, but would like to restrict PUT (i.e., `update` action) and DELETE requests only to the user who created the entry, you could use the following code in the `src/api/restaurant/routes/restaurant.js` file:
```js title="src/api/restaurant/routes/restaurant.js"
/**
* restaurant router
*/
const { createCoreRouter } = require("@strapi/strapi").factories;
module.exports = createCoreRouter("api::restaurant.restaurant", {
config: {
update: {
middlewares: ["api::restaurant.is-owner"],
},
delete: {
middlewares: ["api::restaurant.is-owner"],
},
},
});
```
:::info
You can find more information about route middlewares in the [routes documentation](/cms/backend-customization/routes).
:::
# Models
Source: https://docs.strapi.io/cms/backend-customization/models
# Models
As Strapi is a headless Content Management System (CMS), creating a content structure for the content is one of the most important aspects of using the software. Models define a representation of the content structure.
There are 2 different types of models in Strapi:
- content-types, which can be collection types or single types, depending on how many entries they manage,
- and components that are content structures re-usable in multiple content-types.
If you are just starting out, it is convenient to generate some models with the [Content-type Builder](/cms/features/content-type-builder) directly in the admin panel. The user interface takes over a lot of validation tasks and showcases all the options available to create the content's content structure. The generated model mappings can then be reviewed at the code level using this documentation.
## Model creation
Content-types and components models are created and stored differently.
### Content-types
Content-types in Strapi can be created:
- with the [Content-type Builder in the admin panel](/cms/features/content-type-builder),
- or with [Strapi's interactive CLI `strapi generate`](/cms/cli#strapi-generate) command.
The content-types use the following files:
- `schema.json` for the model's [schema](#model-schema) definition. (generated automatically, when creating content-type with either method)
- `lifecycles.js` for [lifecycle hooks](#lifecycle-hooks). This file must be created manually.
These models files are stored in `./src/api/[api-name]/content-types/[content-type-name]/`, and any JavaScript or JSON file found in these folders will be loaded as a content-type's model (see [project structure](/cms/project-structure)).
:::note
In [TypeScript](/cms/typescript.md)-enabled projects, schema typings can be generated using the `ts:generate-types` command.
:::
### Components {#components-creation}
Component models can't be created with CLI tools. Use the [Content-type Builder](/cms/features/content-type-builder) or create them manually.
Components models are stored in the `./src/components` folder. Every component has to be inside a subfolder, named after the category the component belongs to (see [project structure](/cms/project-structure)).
## Model schema
The `schema.json` file of a model consists of:
- [settings](#model-settings), such as the kind of content-type the model represents or the table name in which the data should be stored,
- [information](#model-information), mostly used to display the model in the admin panel and access it through the REST and GraphQL APIs,
- [attributes](#model-attributes), which describe the content structure of the model,
- and [options](#model-options) used to defined specific behaviors on the model.
### Model settings
General settings for the model can be configured with the following parameters:
| Parameter | Type | Description |
| -------------------------------------------- | ------ | ---------------------------------------------------------------------------------------------------------------------- |
| `collectionName` | String | Database table name in which the data should be stored |
| `kind`
_Optional, only for content-types_ | String | Defines if the content-type is:
a collection type (`collectionType`)
or a single type (`singleType`)
|
```json
// ./src/api/[api-name]/content-types/restaurant/schema.json
{
"kind": "collectionType",
"collectionName": "Restaurants_v1",
}
```
### Model information
The `info` key in the model's schema describes information used to display the model in the admin panel and access it through the Content API. It includes the following parameters:
| Parameter | Type | Description |
| -------------- | ------ | ------------------------------------------------------------------------------------------------------------------------------------------- |
| `displayName` | String | Default name to use in the admin panel |
| `singularName` | String | Singular form of the content-type name. Used to generate the API routes and databases/tables collection.
Should be kebab-case. |
| `pluralName` | String | Plural form of the content-type name. Used to generate the API routes and databases/tables collection.
Should be kebab-case. |
| `description` | String | Description of the model |
```json title="./src/api/[api-name]/content-types/restaurant/schema.json"
"info": {
"displayName": "Restaurant",
"singularName": "restaurant",
"pluralName": "restaurants",
"description": ""
},
```
### Model attributes
The content structure of a model consists of a list of attributes. Each attribute has a `type` parameter, which describes its nature and defines the attribute as a simple piece of data or a more complex structure used by Strapi.
Many types of attributes are available:
- scalar types (e.g. strings, dates, numbers, booleans, etc.),
- Strapi-specific types, such as:
- `media` for files uploaded through the [Media library](/cms/features/content-type-builder#media)
- `relation` to describe a [relation](#relations) between content-types
- `customField` to describe [custom fields](#custom-fields) and their specific keys
- `component` to define a [component](#components-json) (i.e. a content structure usable in multiple content-types)
- `dynamiczone` to define a [dynamic zone](#dynamic-zones) (i.e. a flexible space based on a list of components)
- and the `locale` and `localizations` types, only used by the [Internationalization (i18n) plugin](/cms/features/internationalization)
The `type` parameter of an attribute should be one of the following values:
| Type categories | Available types |
|------|-------|
| String types |
`string`
`text`
`richtext`
`enumeration`
`email`
`password`
[`uid`](#uid-type)
|
| Date types |
`date`
`time`
`datetime`
`timestamp`
|
| Number types |
`integer`
`biginteger`
`float`
`decimal`
|
| Other generic types |
`boolean`
`json`
|
| Special types unique to Strapi |
`media`
[`relation`](#relations)
[`customField`](#custom-fields)
[`component`](#components-json)
[`dynamiczone`](#dynamic-zones)
|
| Internationalization (i18n)-related types
_Can only be used if the [i18n](/cms/features/internationalization) is enabled on the content-type_|
`locale`
`localizations`
|
#### Validations
Basic validations can be applied to attributes using the following parameters:
| Parameter | Type | Description | Default |
| -------------- | ------- | --------------------------------------------------------------------------------------------------------- | ------- |
| `required` | Boolean | If `true`, adds a required validator for this property | `false` |
| `max` | Integer | Checks if the value is greater than or equal to the given maximum | - |
| `min` | Integer | Checks if the value is less than or equal to the given minimum | - |
| `minLength` | Integer | Minimum number of characters for a field input value | - |
| `maxLength` | Integer | Maximum number of characters for a field input value | - |
| `private` | Boolean | If `true`, the attribute will be removed from the server response.
💡 This is useful to hide sensitive data. | `false` |
| `configurable` | Boolean | If `false`, the attribute isn't configurable from the Content-type Builder plugin. | `true` |
```json title="./src/api/[api-name]/content-types/restaurant/schema.json"
{
// ...
"attributes": {
"title": {
"type": "string",
"minLength": 3,
"maxLength": 99,
"unique": true
},
"description": {
"default": "My description",
"type": "text",
"required": true
},
"slug": {
"type": "uid",
"targetField": "title"
}
// ...
}
}
```
#### Database validations and settings
:::caution 🚧 This API is considered experimental.
These settings should be reserved to an advanced usage, as they might break some features. There are no plans to make these settings stable.
:::
Database validations and settings are custom options passed directly onto the `tableBuilder` Knex.js function during schema migrations. Database validations allow for an advanced degree of control for setting custom column settings. The following options are set in a `column: {}` object per attribute:
| Parameter | Type | Description | Default |
| ------------- | ------- | --------------------------------------------------------------------------------------------- | ------- |
| `name` | string | Changes the name of the column in the database | - |
| `defaultTo` | string | Sets the database `defaultTo`, typically used with `notNullable` | - |
| `notNullable` | boolean | Sets the database `notNullable`, ensures that columns cannot be null | `false` |
| `unsigned` | boolean | Only applies to number columns, removes the ability to go negative but doubles maximum length | `false` |
| `unique` | boolean | Enforces database-level uniqueness on published entries. Draft saves skip the check when Draft & Publish is enabled, so duplicates fail only at publish time. | `false` |
| `type` | string | Changes the database type, if `type` has arguments, you should pass them in `args` | - |
| `args` | array | Arguments passed into the Knex.js function that changes things like `type` | `[]` |
:::caution Draft & Publish and `unique`
When [Draft & Publish](/cms/features/draft-and-publish) is enabled, Strapi intentionally skips `unique` validations while an entry is saved as a draft. Duplicates therefore remain undetected until publication, at which point the database constraint triggers an error even though the UI previously displayed “Saved document” for the drafts.
To avoid unexpected publication failures:
- disable Draft & Publish on content-types that must stay globally unique,
- or add custom validation (e.g. lifecycle hooks or middleware) that checks for draft duplicates before saving,
- or rely on automatically generated unique identifiers such as a `uid` field and document editorial conventions.
:::
```json title="./src/api/[api-name]/content-types/restaurant/schema.json"
{
// ...
"attributes": {
"title": {
"type": "string",
"minLength": 3,
"maxLength": 99,
"unique": true,
"column": {
"unique": true // enforce database unique also
}
},
"description": {
"default": "My description",
"type": "text",
"required": true,
"column": {
"defaultTo": "My description", // set database level default
"notNullable": true // enforce required at database level, even for drafts
}
},
"rating": {
"type": "decimal",
"default": 0,
"column": {
"defaultTo": 0,
"type": "decimal", // using the native decimal type but allowing for custom precision
"args": [
6,1 // using custom precision and scale
]
}
}
// ...
}
}
```
#### `uid` type
The `uid` type is used to automatically prefill the field value in the admin panel with a unique identifier (UID) (e.g. slugs for articles) based on 2 optional parameters:
- `targetField` (string): If used, the value of the field defined as a target is used to auto-generate the UID.
- `options` (string): If used, the UID is generated based on a set of options passed to
#### Custom fields
[Custom fields](/cms/features/custom-fields) extend Strapi’s capabilities by adding new types of fields to content-types. Custom fields are explicitly defined in the [attributes](#model-attributes) of a model with `type: customField`.
Custom fields' attributes also show the following specificities:
- a `customField` attribute whose value acts as a unique identifier to indicate which registered custom field should be used. Its value follows:
- either the `plugin::plugin-name.field-name` format if a plugin created the custom field
- or the `global::field-name` format for a custom field specific to the current Strapi application
- and additional parameters depending on what has been defined when registering the custom field (see [custom fields documentation](/cms/features/custom-fields)).
```json title="./src/api/[apiName]/[content-type-name]/content-types/schema.json"
{
// …
"attributes": {
"attributeName": { // attributeName would be replaced by the actual attribute name
"type": "customField",
"customField": "plugin::color-picker.color",
"options": {
"format": "hex"
}
}
}
// …
}
```
#### Components {#components-json}
Component fields create a relation between a content-type and a component structure. Components are explicitly defined in the [attributes](#model-attributes) of a model with `type: 'component'` and accept the following additional parameters:
| Parameter | Type | Description |
| ------------ | ------- | ---------------------------------------------------------------------------------------- |
| `repeatable` | Boolean | Could be `true` or `false` depending on whether the component is repeatable or not |
| `component` | String | Define the corresponding component, following this format: `.` |
```json title="./src/api/[apiName]/restaurant/content-types/schema.json"
{
"attributes": {
"openinghours": {
"type": "component",
"repeatable": true,
"component": "restaurant.openinghours"
}
}
}
```
#### Dynamic zones
Dynamic zones create a flexible space in which to compose content, based on a mixed list of [components](#components-json).
Dynamic zones are explicitly defined in the [attributes](#model-attributes) of a model with `type: 'dynamiczone'`. They also accept a `components` array, where each component should be named following this format: `.`.
```json title="./src/api/[api-name]/content-types/article/schema.json"
{
"attributes": {
"body": {
"type": "dynamiczone",
"components": ["article.slider", "article.content"]
}
}
}
```
### Model options
The `options` key is used to define specific behaviors and accepts the following parameter:
| Parameter | Type | Description |
|---------------------|------------------|--------------------------------------------------------------------------------------------------------------------------------------------------------------------------------------------------------------------------------------------------------------------------------------------------------------------|
| `privateAttributes` | Array of strings | Allows treating a set of attributes as private, even if they're not actually defined as attributes in the model. It could be used to remove them from API responses timestamps.
The `privateAttributes` defined in the model are merged with the `privateAttributes` defined in the global Strapi configuration. |
| `draftAndPublish` | Boolean | Enables the draft and publish feature.
Default value: `true` (`false` if the content-type is created from the interactive CLI). |
| `populateCreatorFields` | Boolean | Populates `createdBy` and `updatedBy` fields in responses returned by the REST API (see [guide](/cms/api/rest/guides/populate-creator-fields) for more details).
Default value: `false`. |
```json title="./src/api/[api-name]/content-types/restaurant/schema.json"
{
"options": {
"privateAttributes": ["id", "createdAt"],
"draftAndPublish": true
}
}
```
### Plugin options
`pluginOptions` is an optional object allowing plugins to store configuration for a model or a specific attribute.
| Key | Value | Description |
|---------------------------|-------------------------------|--------------------------------------------------------|
| `i18n` | `localized: true` | Enables localization. |
| `content-manager` | `visible: false` | Hides from Content Manager in the admin panel. |
| `content-type-builder` | `visible: false` | Hides from Content-type Builder in the admin panel. |
```json title="./src/api/[api-name]/content-types/[content-type-name]/schema.json"
{
"attributes": {
"name": {
"pluginOptions": {
"i18n": {
"localized": true
}
},
"type": "string",
"required": true
},
"slug": {
"pluginOptions": {
"i18n": {
"localized": true
}
},
"type": "uid",
"targetField": "name",
"required": true
}
// …additional attributes
}
}
```
## Lifecycle hooks
Lifecycle hooks are functions that get triggered when Strapi queries are called. They are triggered automatically when managing content through the administration panel or when developing custom code using `queries`·
Lifecycle hooks can be customized declaratively or programmatically.
:::caution
Lifecycles hooks are not triggered when using directly the
Using the database layer API, it's also possible to register a subscriber and listen to events programmatically:
```js title="./src/index.js"
module.exports = {
async bootstrap({ strapi }) {
// registering a subscriber
strapi.db.lifecycles.subscribe({
models: [], // optional;
beforeCreate(event) {
const { data, where, select, populate } = event.params;
event.state = 'doStuffAfterWards';
},
afterCreate(event) {
if (event.state === 'doStuffAfterWards') {
}
const { result, params } = event;
// do something to the result
},
});
// generic subscribe for generic handling
strapi.db.lifecycles.subscribe((event) => {
if (event.action === 'beforeCreate') {
// do something
}
});
}
}
```
# Policies
Source: https://docs.strapi.io/cms/backend-customization/policies
# Policies
Policies are functions that execute specific logic on each request before it reaches the [controller](/cms/backend-customization/controllers). They are mostly used for securing business logic.
Each [route](/cms/backend-customization/routes) of a Strapi project can be associated to an array of policies. For example, a policy named `is-admin` could check that the request is sent by an admin user, and restrict access to critical routes.
Policies can be global or scoped. [Global policies](#global-policies) can be associated to any route in the project. Scoped policies only apply to a specific [API](#api-policies) or [plugin](#plugin-policies) and should live under the corresponding `./src/api//policies/` or `./src/plugins//policies/` folder.
The diagram represents a simplified version of how a request travels through the Strapi back end, with policies and routes highlighted. The backend customization introduction page includes a complete, interactive diagram.
## Implementation
A new policy can be implemented:
- with the [interactive CLI command `strapi generate`](/cms/cli#strapi-generate)
- or manually by creating a JavaScript file in the appropriate folder (see [project structure](/cms/project-structure)):
- `./src/policies/` for global policies
- `./src/api/[api-name]/policies/` for API policies
- `./src/plugins/[plugin-name]/policies/` for plugin policies
Global policy implementation example:
`policyContext` is a wrapper around the [controller](/cms/backend-customization/controllers) context. It adds some logic that can be useful to implement a policy for both REST and GraphQL.
Policies can be configured using a `config` object:
## Usage
To apply policies to a route, add them to its configuration object (see [routes documentation](/cms/backend-customization/routes#policies)).
Policies are called different ways depending on their scope:
- use `global::policy-name` for [global policies](#global-policies)
- use `api::api-name.policy-name` for [API policies](#api-policies)
- use `plugin::plugin-name.policy-name` for [plugin policies](#plugin-policies)
:::tip
To list all the available policies, run `yarn strapi policies:list`.
:::
### Global policies
Global policies can be associated to any route in a project.
### Plugin policies
Plugins can add and expose policies to an application. For example, the [Users & Permissions feature](/cms/features/users-permissions) comes with policies to ensure that the user is authenticated or has the rights to perform an action:
### API policies
API policies are associated to the routes defined in the API where they have been declared.
To use a policy in another API, reference it with the following syntax: `api::[apiName].[policyName]`:
# Requests and Responses
Source: https://docs.strapi.io/cms/backend-customization/requests-responses
# Requests and Responses
The Strapi back end server is based on . When you send requests through the [REST API](/cms/api/rest), a context object (`ctx`) is passed to every element of the Strapi back end (e.g., [policies](/cms/backend-customization/policies), [controllers](/cms/backend-customization/controllers), [services](/cms/backend-customization/services)).
`ctx` includes 3 main objects:
- [`ctx.request`](#ctxrequest) for information about the request sent by the client making an API request,
- [`ctx.state`](#ctxstate) for information about the state of the request within the Strapi back end,
- and [`ctx.response`](#ctxresponse) for information about the response that the server will return.
:::tip
The request's context can also be accessed from anywhere in the code with the [`strapi.requestContext` function](#accessing-the-request-context-anywhere).
:::
:::info
In addition to the concepts and parameters described in the following documentation, you might find additional information in the , and .
:::
The diagram represents a simplified version of how a request travels through the Strapi back end, with requests and responses highlighted. The backend customization introduction page includes a complete, interactive diagram.
## `ctx.request`
The `ctx.request` object contains the following parameters:
| Parameter | Description | Type |
| --------------------- | -------------------------------------------------------------------------------------------- | -------- |
| `ctx.request.body` | Parsed version of the body. | `Object` |
| `ctx.request.files` | Files sent with the request. | `Array` |
| `ctx.request.headers` | Headers sent with the request. | `Object` |
| `ctx.request.host` | Host part of the URL, including the port. | `String` |
| `ctx.request.hostname`| Host part of the URL, excluding the port. | `String` |
| `ctx.request.href` | Complete URL of the requested resource, including the protocol, domain, port (if specified), path, and query parameters. | `String` |
| `ctx.request.ip` | IP of the person sending the request.| `String` |
| `ctx.request.ips` | When `X-Forwarded-For` is present and `app.proxy` is enabled, an array of IPs is returned, ordered from upstream to downstream.
For example if the value were "client, proxy1, proxy2", you would receive the `["client", "proxy1", "proxy2"]` array. | `Array` |
| `ctx.request.method` | Request method (e.g., `GET`, `POST`). | `String` |
| `ctx.request.origin` | URL part before the first `/`. | `String` |
| `ctx.request.params` | Parameters sent in the URL.
For example, if the internal URL is `/restaurants/:id`, whatever you replace `:id` in the real request becomes accessible through `ctx.request.params.id`. | `Object` |
| `ctx.request.path` | Path of the requested resource, excluding the query parameters. | `String` |
| `ctx.request.protocol`| Protocol being used (e.g., `https` or `http`). | `String` |
| `ctx.request.query` | Strapi-specific [query parameters](#ctxrequestquery). | `Object` |
| `ctx.request.subdomains`| Subdomains included in the URL.
For example, if the domain is `tobi.ferrets.example.com`, the value is the following array: `["ferrets", "tobi"]`. | `Array` |
| `ctx.request.url` | Path and query parameters of the requested resource, excluding the protocol, domain, and port. | `String` |
Differences between protocol, origin, url, href, path, host, and hostname :
Given an API request sent to the `https://example.com:1337/api/restaurants?id=123` URL, here is what different parameters of the `ctx.request` object return:
| Parameter | Returned value |
| ---------- | ------------------------------------------------- |
| `ctx.request.href` | `https://example.com:1337/api/restaurants?id=123` |
| `ctx.request.protocol` | `https` |
| `ctx.request.host` | `localhost:1337` |
| `ctx.request.hostname` | `localhost` |
| `ctx.request.origin` | `https://example.com:1337` |
| `ctx.request.url` | `/api/restaurants?id=123` |
| `ctx.request.path` | `/api/restaurants` |
### `ctx.request.query`
`ctx.request` provides a `query` object that gives access to Strapi query parameters. The following table lists available parameters with a short description and a link to the relevant REST API documentation section (see [REST API parameters](/cms/api/rest/parameters) for more information):
| Parameter | Description | Type |
| -------------------------------------| --------------------------------------------------------------------------------------------------------------------------- | -------------------- |
| `ctx.request.query` `ctx.query` | The whole query object. | `Object` |
| `ctx.request.query.sort` | Parameters to [sort the response](/cms/api/rest/sort-pagination.md#sorting) | `String` or `Array` |
| `ctx.request.query.filters` | Parameters to [filter the response](/cms/api/rest/filters) | `Object` |
| `ctx.request.query.populate` | Parameters to [populate relations, components, or dynamic zones](/cms/api/rest/populate-select#population) | `String` or `Object` |
| `ctx.request.query.fields` | Parameters to [select only specific fields to return with the response](/cms/api/rest/populate-select#field-selection) | `Array` |
| `ctx.request.query.pagination` | Parameter to [page through entries](/cms/api/rest/sort-pagination.md#pagination) | `Object` |
| `ctx.request.query.publicationState` | Parameter to [select the Draft & Publish state](/cms/api/rest/status) | `String` |
| `ctx.request.query.locale` | Parameter to [select one or multiple locales](/cms/api/rest/locale) | `String` or `Array` |
## `ctx.state`
The `ctx.state` object gives access to the state of the request within the Strapi back end, including specific values about the [user](#ctxstateuser), [authentication](#ctxstateauth), [route](#ctxstateroute):
| Parameter | Description | Type |
| ---------------------------|---------------------------------------------------------------------------- | -------- |
| `ctx.state.isAuthenticated`| Returns whether the current user is authenticated in any way. | `Boolean` |
### `ctx.state.user`
The `ctx.state.user` object gives access to information about the user performing the request and includes the following parameters:
| Parameter | Description | Type |
| ----------| -------------------------------------------------------------------------------------------- | -------- |
| `ctx.state.user`| User's information. Only one relation is populated. | `Object` |
| `ctx.state.user.role`| The user's role | `Object` |
### `ctx.state.auth`
The `ctx.state.auth` object gives access to information related to the authentication and includes the following parameters:
| Parameter | Description | Type |
| ------------------------------| -------------------------------------------------------------------------------------------- | -------- |
| `ctx.state.auth.strategy` | Information about the currently used authentication strategy ([Users & Permissions plugin](/cms/features/users-permissions) or [API tokens](/cms/features/api-tokens)) | `Object` |
| `ctx.state.auth.strategy.name`| Name of the currently used strategy | `String` |
| `ctx.state.auth.credentials` | The user's credentials | `String` |
### `ctx.state.route`
The `ctx.state.route` object gives access to information related to the current route and includes the following parameters:
| Parameter | Description | Type |
| ----------| -------------------------------------------------------------------------------------------- | -------- |
| `ctx.state.route.method`| Method used to access the current route. | `String` |
| `ctx.state.route.path`| Path of the current route. | `String` |
| `ctx.state.route.config`| Configuration information about the current route. | `Object` |
| `ctx.state.route.handler`| Handler (controller) of the current route. | `Object` |
| `ctx.state.route.info`| Additional information about the current route, such as the apiName and the API request type. | `Object` |
| `ctx.state.route.info.apiName`| Name of the used API. | `String` |
| `ctx.state.route.info.type`| Type of the used API. | `String` |
## `ctx.response`
The `ctx.response` object gives access to information related to the response that the server will return and includes the following parameters:
| Parameter | Description | Type |
| ----------| -------------------------------------------------------------------------------------------- | -------- |
| `ctx.response.body`| Body of the response. | `Any` |
| `ctx.response.status` | Status code of the response. | `Integer` |
| `ctx.response.message`| Status message of the response.
By default, `response.message` is associated with `response.status`. | `String` |
| `ctx.response.header` `ctx.response.headers`| Header(s) sent with the response. | `Object` |
| `ctx.response.length`| header value as a number when present, or deduces it from `ctx.body` when possible; otherwise, returns `undefined`. | `Integer` |
| `ctx.response.redirect` `ctx.response.redirect(url, [alt])` | Performs a `302` redirect to the URL. The string "back" is special-cased to provide Referrer support; when Referrer is not present, alt or "/" is used.
`ctx.response.attachment([filename], [options])` | Sets header to "attachment" to signal the client to prompt for download. Optionally specify the filename of the download and some . | `Function` |
| `ctx.response.type`| header, void of parameters such as "charset". | `String` |
| `ctx.response.lastModified`| header as a Date, if it exists. | `DateTime` |
| `ctx.response.etag`| Sets the of a response including the wrapped "s. There is no corresponding `response.etag` getter. | `String` |
## Accessing the request context anywhere
Strapi exposes a way to access the current request context from anywhere in the code (e.g. lifecycle functions).
You can access the request as follows:
```js
const ctx = strapi.requestContext.get();
```
You should only use this inside of functions that will be called in the context of an HTTP request.
```js
// correct
const service = {
myFunction() {
const ctx = strapi.requestContext.get();
console.log(ctx.state.user);
},
};
// incorrect
const ctx = strapi.requestContext.get();
const service = {
myFunction() {
console.log(ctx.state.user);
},
};
```
**Example:**
```js title="./api/test/content-types/article/lifecycles.js"
module.exports = {
beforeUpdate() {
const ctx = strapi.requestContext.get();
console.log('User info in service: ', ctx.state.user);
},
};
```
:::note
Strapi uses a Node.js feature called to make the context available anywhere.
:::
# Routes
Source: https://docs.strapi.io/cms/backend-customization/routes
# Routes
Requests sent to Strapi on any URL are handled by routes. By default, Strapi generates routes for all the content-types (see [REST API documentation](/cms/api/rest)). Routes can be [added](#implementation) and configured:
- with [policies](#policies), which are a way to block access to a route,
- and with [middlewares](#middlewares), which are a way to control and change the request flow and the request itself.
Once a route exists, reaching it executes some code handled by a controller (see [controllers documentation](/cms/backend-customization/controllers)). To view all existing routes and their hierarchal order, you can run `yarn strapi routes:list` (see [CLI reference](/cms/cli)).
:::tip
If you only customize the default controller actions (`find`, `findOne`, `create`, `update`, or `delete`) that Strapi generates for a content-type, you can leave the router as-is. Those core routes already target the same handler names and will run your new controller logic. Add or edit a route only when you need a brand-new HTTP path/method or want to expose a custom controller action.
:::
The diagram represents a simplified version of how a request travels through the Strapi back end, with routes highlighted. The backend customization introduction page includes a complete, interactive diagram.
## Implementation
Implementing a new route consists in defining it in a router file within the `./src/api/[apiName]/routes` folder (see [project structure](/cms/project-structure)).
There are 2 different router file structures, depending on the use case:
- configuring [core routers](#configuring-core-routers)
- or creating [custom routers](#creating-custom-routers).
### Configuring core routers
Core routers (i.e. `find`, `findOne`, `create`, `update`, and `delete`) correspond to [default routes](/cms/api/rest#endpoints) automatically created by Strapi when a new [content-type](/cms/backend-customization/models#model-creation) is created.
Strapi provides a `createCoreRouter` factory function that automatically generates the core routers and allows:
- passing in configuration options to each router
- and disabling some core routers to [create custom ones](#creating-custom-routers).
A core router file is a JavaScript file exporting the result of a call to `createCoreRouter` with the following parameters:
| Parameter | Description | Type |
| ----------| -------------------------------------------------------------------------------------------- | -------- |
| `prefix` | Allows passing in a custom prefix to add to all routers for this model (e.g. `/test`) | `String` |
| `only` | Core routes that will only be loaded
Anything not in this array is ignored. | `Array` | -->
| `except` | Core routes that should not be loaded
This is functionally the opposite of the `only` parameter. | `Array` |
| `config` | Configuration to handle [policies](#policies), [middlewares](#middlewares) and [public availability](#public-routes) for the route | `Object` |
Generic implementation example:
This only allows a `GET` request on the `/restaurants` path from the core `find` [controller](/cms/backend-customization/controllers) without authentication. When you reference custom controller actions in custom routers, prefer the fully‑qualified `api::..` form for clarity (e.g., `api::restaurant.restaurant.review`).
### Creating custom routers
Creating custom routers consists in creating a file that exports an array of objects, each object being a route with the following parameters:
| Parameter | Description | Type |
| -------------------------- | -------------------------------------------------------------------------------- | -------- |
| `method` | Method associated to the route (i.e. `GET`, `POST`, `PUT`, `DELETE` or `PATCH`) | `String` |
| `path` | Path to reach, starting with a forward-leading slash (e.g. `/articles`)| `String` |
| `handler` | Function to execute when the route is reached. Use the fully-qualified syntax `api::api-name.controllerName.actionName` (or `plugin::plugin-name.controllerName.actionName`). The short `.` form for legacy projects also works. | `String` |
| `config`
_Optional_ | Configuration to handle [policies](#policies), [middlewares](#middlewares) and [public availability](#public-routes) for the route
| `Object` |
Dynamic routes can be created using parameters and regular expressions. These parameters will be exposed in the `ctx.params` object. For more details, please refer to the
## Configuration
Both [core routers](#configuring-core-routers) and [custom routers](#creating-custom-routers) have the same configuration options. The routes configuration is defined in a `config` object that can be used to handle [policies](#policies) and [middlewares](#middlewares) or to [make the route public](#public-routes).
### Policies
[Policies](/cms/backend-customization/policies) can be added to a route configuration:
- by pointing to a policy registered in `./src/policies`, with or without passing a custom configuration
- or by declaring the policy implementation directly, as a function that takes `policyContext` to extend
### Middlewares
[Middlewares](/cms/backend-customization/middlewares) can be added to a route configuration:
- by pointing to a middleware registered in `./src/middlewares`, with or without passing a custom configuration
- or by declaring the middleware implementation directly, as a function that takes
### Public routes
By default, routes are protected by Strapi's authentication system, which is based on [API tokens](/cms/features/api-tokens) or on the use of the [Users & Permissions plugin](/cms/features/users-permissions).
In some scenarios, it can be useful to have a route publicly available and control the access outside of the normal Strapi authentication system. This can be achieved by setting the `auth` configuration parameter of a route to `false`:
## Custom Content API parameters {#custom-content-api-parameters}
You can extend the `query` and body parameters allowed on Content API routes by registering them in the [register](/cms/configurations/functions#register) lifecycle. Registered parameters are then validated and sanitized like core parameters. Clients can send extra query keys (e.g. `?search=...`) or root-level body keys (e.g. `clientMutationId`) without requiring custom routes or controllers.
| What | Where |
|------|--------|
| Enable strict parameters (reject unknown query/body keys) | [API configuration](/cms/configurations/api): set `rest.strictParams: true` in `./config/api.js` (or `./config/api.ts`). |
| Add allowed parameters (app) | Call `addQueryParams` / `addInputParams` in [register](/cms/configurations/functions#register) in `./src/index.js` or `./src/index.ts`. |
| Add allowed parameters (plugin) | Call `addQueryParams` / `addInputParams` in the plugin's [register](/cms/plugins-development/server-lifecycle#register) lifecycle. |
When `rest.strictParams` is enabled, only core parameters and parameters on each route's request schema are accepted; the parameters you register are merged into that schema. Use the `z` instance from `@strapi/utils` (or `zod/v4`) for schemas.
### `addQueryParams`
`strapi.contentAPI.addQueryParams(options)` registers extra `query` parameters. Schemas must be scalar or array-of-scalars (string, number, boolean, enum). For nested structures, use `addInputParams` instead. Each entry can have an optional `matchRoute: (route) => boolean` callback to add the parameter only to routes for which the callback returns true. You cannot register core query param names (e.g. `filters`, `sort`, `fields`) as extra params; they are reserved.
### `addInputParams`
`strapi.contentAPI.addInputParams(options)` registers extra input parameters: root-level keys in the request body (e.g. alongside `data`), with any Zod type. The optional `matchRoute` callback works the same way as for `addQueryParams`. You cannot register reserved names such as `id` or `documentId` as input params.
### `matchRoute`
The `matchRoute` callback receives a `route` object with the following properties:
- `route.method`: the HTTP method (`'GET'`, `'POST'`, etc.)
- `route.path`: the route path
- `route.handler`: the controller action string
- `route.info`: metadata about the route
For example, to target only GET routes, use `matchRoute: (route) => route.method === 'GET'`. To target only routes whose path includes `articles`, use `matchRoute: (route) => route.path.includes('articles')`.
# Services
Source: https://docs.strapi.io/cms/backend-customization/services
# Services
Services are a set of reusable functions. They are particularly useful to respect the "don’t repeat yourself" (DRY) programming concept and to simplify [controllers](/cms/backend-customization/controllers.md) logic.
The diagram represents a simplified version of how a request travels through the Strapi back end, with services highlighted. The backend customization introduction page includes a complete, interactive diagram.
## Implementation
Services can be [generated or added manually](#adding-a-new-service). Strapi provides a `createCoreService` factory function that automatically generates core services and allows building custom ones or [extend or replace the generated services](#extending-core-services).
### Adding a new service
A new service can be implemented:
- with the [interactive CLI command `strapi generate`](/cms/cli#strapi-generate)
- or manually by creating a JavaScript file in the appropriate folder (see [project structure](/cms/project-structure.md)):
- `./src/api/[api-name]/services/` for API services
- or `./src/plugins/[plugin-name]/services/` for [plugin services](/cms/plugins-development/server-controllers-services).
To manually create a service, export a factory function that returns the service implementation (i.e. an object with methods). This factory function receives the `strapi` instance:
:::strapi Document Service API
To get started creating your own services, see Strapi's built-in functions in the [Document Service API](/cms/api/document-service) documentation.
:::
Example of a custom email service (using Nodemailer)
The goal of a service is to store reusable functions. A `sendNewsletter` service could be useful to send emails from different functions in our codebase that have a specific purpose:
The service is now available through the `strapi.service('api::restaurant.restaurant').sendNewsletter(...args)` global variable. It can be used in another part of the codebase, like in the following controller:
:::note
When a new [content-type](/cms/backend-customization/models.md#content-types) is created, Strapi builds a generic service with placeholder code, ready to be customized.
:::
### Extending core services
Core services are created for each content-type and could be used by [controllers](/cms/backend-customization/controllers.md) to execute reusable logic through a Strapi project. Core services can be customized to implement your own logic. The following code examples should help you get started.
:::tip
A core service can be replaced entirely by [creating a custom service](#adding-a-new-service) and naming it the same as the core service (e.g. `find`, `findOne`, `create`, `update`, or `delete`).
:::
Collection type examplesSingle type examples
## Usage
Once a service is created, it's accessible from [controllers](/cms/backend-customization/controllers.md) or from other services:
```js
// access an API service
strapi.service('api::apiName.serviceName').FunctionName();
// access a plugin service
strapi.service('plugin::pluginName.serviceName').FunctionName();
```
In the syntax examples above, `serviceName` is the name of the service file for API services or the name used to export the service file to `services/index.js` for plugin services.
:::tip
To list all the available services, run `yarn strapi services:list`.
:::
### Core service methods
Services generated with `createCoreService` inherit methods that wrap the [Document Service API](/cms/api/document-service). The available methods depend on the content-type:
#### Collection types
| Method | Description |
| --- | --- |
| `find(params)` | Wrapper for [`findMany`](/cms/api/document-service#findmany); returns a paginated list of documents. |
| `findOne(documentId, params)` | Wrapper for [`findOne`](/cms/api/document-service#findone); returns a single document by its `documentId`. |
| `create(params)` | Wrapper for [`create`](/cms/api/document-service#create); creates a new document. |
| `update(documentId, params)` | Wrapper for [`update`](/cms/api/document-service#update); updates an existing document. |
| `delete(documentId, params)` | Wrapper for [`delete`](/cms/api/document-service#delete); removes a document. |
| `count(params)` | Wrapper for [`count`](/cms/api/document-service#count); returns the number of matching documents. |
| `publish(documentId, params)` | Wrapper for [`publish`](/cms/api/document-service#publish); publishes a draft document. |
| `unpublish(documentId, params)` | Wrapper for [`unpublish`](/cms/api/document-service#unpublish); unpublishes a document. |
| `discardDraft(documentId, params)` | Wrapper for [`discardDraft`](/cms/api/document-service#discarddraft); deletes the draft copy. |
#### Single types
| Method | Description |
| --- | --- |
| `find(params)` | Returns the single document (uses [`findFirst`](/cms/api/document-service#findfirst) internally). |
| `createOrUpdate({ data, ...params })` | Creates the document if it doesn't exist or updates it (uses [`update`](/cms/api/document-service#update)). |
| `delete(params)` | Deletes the document (uses [`delete`](/cms/api/document-service#delete)). |
| `count(params)` | Counts documents matching the filters (uses [`count`](/cms/api/document-service#count)). |
| `publish(params)` | Publishes a draft document (uses [`publish`](/cms/api/document-service#publish)). |
| `unpublish(params)` | Unpublishes the document (uses [`unpublish`](/cms/api/document-service#unpublish)). |
| `discardDraft(params)` | Deletes the draft copy (uses [`discardDraft`](/cms/api/document-service#discarddraft)). |
#### Parameters and default behavior
Core service methods accept the same parameters as their underlying [Document Service API](/cms/api/document-service) calls, such as `fields`, `filters`, `sort`, `pagination`, `populate`, `locale`, and `status`. When no `status` is provided, Strapi automatically sets `status: 'published'` so only published content is returned. To query draft documents, explicitly pass `status: 'draft'` or another value supported by the Document Service.
The `createCoreService` factory also exposes a `getFetchParams(params)` helper that converts a controller's query object into the parameter format expected by these methods. This helper can be reused when overriding core methods to forward sanitized parameters to `strapi.documents()`.
# Webhooks
Source: https://docs.strapi.io/cms/backend-customization/webhooks
# Webhooks
Webhook is a construct used by an application to notify other applications that an event occurred. More precisely, webhook is a user-defined HTTP callback. Using a webhook is a good way to tell third-party providers to start some processing (CI, build, deployment ...).
The way a webhook works is by delivering information to a receiving application through HTTP requests (typically POST requests).
## User content-type webhooks
To prevent from unintentionally sending any user's information to other applications, Webhooks will not work for the User content-type.
If you need to notify other applications about changes in the Users collection, you can do so by creating [Lifecycle hooks](/cms/backend-customization/models#lifecycle-hooks) using the `./src/index.js` example.
## Available configurations
You can set webhook configurations inside the file `./config/server`.
- `webhooks`
- `defaultHeaders`: You can set default headers to use for your webhook requests. This option is overwritten by the headers set in the webhook itself.
**Example configuration**
## Webhooks security
Most of the time, webhooks make requests to public URLs, therefore it is possible that someone may find that URL and send it wrong information.
To prevent this from happening you can send a header with an authentication token. Using the Admin panel you would have to do it for every webhook.
Another way is to define `defaultHeaders` to add to every webhook request.
You can configure these global headers by updating the file at `./config/server`:
If you are developing the webhook handler yourself you can now verify the token by reading the headers.
### Verifying signatures
In addition to auth headers, it's recommended to sign webhook payloads and verify signatures server‑side to prevent tampering and replay attacks. To do so, you can use the following guidelines:
- Generate a shared secret and store it in environment variables
- Have the sender compute an HMAC (e.g., SHA‑256) over the raw request body plus a timestamp
- Send the signature (and timestamp) in headers (e.g., `X‑Webhook‑Signature`, `X‑Webhook‑Timestamp`)
- On receipt, recompute the HMAC and compare using a constant‑time check
- Reject if the signature is invalid or the timestamp is too old to mitigate replay
Example: Verify HMAC signatures (Node.js)
Here is a minimal Node.js middleware example (pseudo‑code) showing
Here are a few additional external examples:
-
-
## Available events
By default Strapi webhooks can be triggered by the following events:
| Name | Description |
| ----------------- | ----------------------------------------------------- |
| [`entry.create`](#entrycreate) | Triggered when a Content Type entry is created. |
| [`entry.update`](#entryupdate) | Triggered when a Content Type entry is updated. |
| [`entry.delete`](#entrydelete) | Triggered when a Content Type entry is deleted. |
| [`entry.publish`](#entrypublish) | Triggered when a Content Type entry is published.\* |
| [`entry.unpublish`](#entryunpublish) | Triggered when a Content Type entry is unpublished.\* |
| [`media.create`](#mediacreate) | Triggered when a media is created. |
| [`media.update`](#mediaupdate) | Triggered when a media is updated. |
| [`media.delete`](#mediadelete) | Triggered when a media is deleted. |
| [`review-workflows.updateEntryStage`](#review-workflowsupdateentrystage) | Triggered when content is moved between review stages (see [review workflows](/cms/features/review-workflows#configuration)). This event is only available with the edition of Strapi. |
| [`releases.publish`](#releases-publish) | Triggered when a Release is published (see [Releases](/cms/features/releases)). This event is only available with the or plan of Strapi CMS. |
\*only when `draftAndPublish` is enabled on this Content Type.
## Payloads
:::info
Private fields are not sent in the payload.
:::
### Headers
When a payload is delivered to your webhook's URL, it will contain specific headers:
| Header | Description |
| ---------------- | ------------------------------------------ |
| `X-Strapi-Event` | Name of the event type that was triggered. |
### `entry.create`
This event is triggered when a new entry is created.
**Example payload**
```json
{
"event": "entry.create",
"createdAt": "2020-01-10T08:47:36.649Z",
"model": "address",
"entry": {
"id": 1,
"geolocation": {},
"city": "Paris",
"postal_code": null,
"category": null,
"full_name": "Paris",
"createdAt": "2020-01-10T08:47:36.264Z",
"updatedAt": "2020-01-10T08:47:36.264Z",
"cover": null,
"images": []
}
}
```
### `entry.update`
This event is triggered when an entry is updated.
**Example payload**
```json
{
"event": "entry.update",
"createdAt": "2020-01-10T08:58:26.563Z",
"model": "address",
"entry": {
"id": 1,
"geolocation": {},
"city": "Paris",
"postal_code": null,
"category": null,
"full_name": "Paris",
"createdAt": "2020-01-10T08:47:36.264Z",
"updatedAt": "2020-01-10T08:58:26.210Z",
"cover": null,
"images": []
}
}
```
### `entry.delete`
This event is triggered when an entry is deleted.
**Example payload**
```json
{
"event": "entry.delete",
"createdAt": "2020-01-10T08:59:35.796Z",
"model": "address",
"entry": {
"id": 1,
"geolocation": {},
"city": "Paris",
"postal_code": null,
"category": null,
"full_name": "Paris",
"createdAt": "2020-01-10T08:47:36.264Z",
"updatedAt": "2020-01-10T08:58:26.210Z",
"cover": null,
"images": []
}
}
```
### `entry.publish`
This event is triggered when an entry is published.
**Example payload**
```json
{
"event": "entry.publish",
"createdAt": "2020-01-10T08:59:35.796Z",
"model": "address",
"entry": {
"id": 1,
"geolocation": {},
"city": "Paris",
"postal_code": null,
"category": null,
"full_name": "Paris",
"createdAt": "2020-01-10T08:47:36.264Z",
"updatedAt": "2020-01-10T08:58:26.210Z",
"publishedAt": "2020-08-29T14:20:12.134Z",
"cover": null,
"images": []
}
}
```
### `entry.unpublish`
This event is triggered when an entry is unpublished.
**Example payload**
```json
{
"event": "entry.unpublish",
"createdAt": "2020-01-10T08:59:35.796Z",
"model": "address",
"entry": {
"id": 1,
"geolocation": {},
"city": "Paris",
"postal_code": null,
"category": null,
"full_name": "Paris",
"createdAt": "2020-01-10T08:47:36.264Z",
"updatedAt": "2020-01-10T08:58:26.210Z",
"publishedAt": null,
"cover": null,
"images": []
}
}
```
### `media.create`
This event is triggered when you upload a file on entry creation or through the media interface.
**Example payload**
```json
{
"event": "media.create",
"createdAt": "2020-01-10T10:58:41.115Z",
"media": {
"id": 1,
"name": "image.png",
"hash": "353fc98a19e44da9acf61d71b11895f9",
"sha256": "huGUaFJhmcZRHLcxeQNKblh53vtSUXYaB16WSOe0Bdc",
"ext": ".png",
"mime": "image/png",
"size": 228.19,
"url": "/uploads/353fc98a19e44da9acf61d71b11895f9.png",
"provider": "local",
"provider_metadata": null,
"createdAt": "2020-01-10T10:58:41.095Z",
"updatedAt": "2020-01-10T10:58:41.095Z",
"related": []
}
}
```
### `media.update`
This event is triggered when you replace a media or update the metadata of a media through the media interface.
**Example payload**
```json
{
"event": "media.update",
"createdAt": "2020-01-10T10:58:41.115Z",
"media": {
"id": 1,
"name": "image.png",
"hash": "353fc98a19e44da9acf61d71b11895f9",
"sha256": "huGUaFJhmcZRHLcxeQNKblh53vtSUXYaB16WSOe0Bdc",
"ext": ".png",
"mime": "image/png",
"size": 228.19,
"url": "/uploads/353fc98a19e44da9acf61d71b11895f9.png",
"provider": "local",
"provider_metadata": null,
"createdAt": "2020-01-10T10:58:41.095Z",
"updatedAt": "2020-01-10T10:58:41.095Z",
"related": []
}
}
```
### `media.delete`
This event is triggered only when you delete a media through the media interface.
**Example payload**
```json
{
"event": "media.delete",
"createdAt": "2020-01-10T11:02:46.232Z",
"media": {
"id": 11,
"name": "photo.png",
"hash": "43761478513a4c47a5fd4a03178cfccb",
"sha256": "HrpDOKLFoSocilA6B0_icA9XXTSPR9heekt2SsHTZZE",
"ext": ".png",
"mime": "image/png",
"size": 4947.76,
"url": "/uploads/43761478513a4c47a5fd4a03178cfccb.png",
"provider": "local",
"provider_metadata": null,
"createdAt": "2020-01-07T19:34:32.168Z",
"updatedAt": "2020-01-07T19:34:32.168Z",
"related": []
}
}
```
### `review-workflows.updateEntryStage`
This event is only available with the plan of Strapi. The event is triggered when content is moved to a new review stage (see [Review Workflows](/cms/features/review-workflows#configuration)).
**Example payload**
```json
{
"event": "review-workflows.updateEntryStage",
"createdAt": "2023-06-26T15:46:35.664Z",
"model": "model",
"uid": "uid",
"entity": {
"id": 2
},
"workflow": {
"id": 1,
"stages": {
"from": {
"id": 1,
"name": "Stage 1"
},
"to": {
"id": 2,
"name": "Stage 2"
}
}
}
}
```
### `releases.publish` {#releases-publish}
The event is triggered when a [release](/cms/features/releases) is published.
**Example payload**
```json
{
"event": "releases.publish",
"createdAt": "2024-02-21T16:45:36.877Z",
"isPublished": true,
"release": {
"id": 2,
"name": "Fall Winter highlights",
"releasedAt": "2024-02-21T16:45:36.873Z",
"scheduledAt": null,
"timezone": null,
"createdAt": "2024-02-21T15:16:22.555Z",
"updatedAt": "2024-02-21T16:45:36.875Z",
"actions": {
"count": 1
}
}
}
```
## Best practices for webhook handling
- Validate incoming requests by checking headers and payload signatures.
- Implement retries for failed webhook requests to handle transient errors.
- Log webhook events for debugging and monitoring.
- Use secure, HTTPS endpoints for receiving webhooks.
- Set up rate limiting to avoid being overwhelmed by multiple webhook requests.
:::tip
If you want to learn more about how to use webhooks with Next.js, please have a look at the [dedicated blog article](https://strapi.io/blog/how-to-create-an-ssg-static-site-generation-application-with-strapi-webhooks-and-nextjs).
:::
# Command Line Interface
Source: https://docs.strapi.io/cms/cli
# Command Line Interface (CLI)
Strapi comes with a full featured Command Line Interface (CLI) which lets you scaffold and manage your project in seconds. The CLI works with both the `yarn` and `npm` package managers.
:::caution
Interactive commands such as `strapi admin:create-user` don't display prompts with `npm`. Please consider using the `yarn` package manager.
:::
:::note
It is recommended to install Strapi locally only, which requires prefixing all of the following `strapi` commands with the package manager used for the project setup (e.g `npm run strapi help` or `yarn strapi help`) or a dedicated node package executor (e.g. `npx strapi help`).
To pass options with `npm` use the syntax: `npm run strapi -- --